📘 WhatzCRM – Getting Started & Usage Guide
WhatzCRM is an all-in-one WhatsApp CRM platform that helps businesses manage conversations, contacts, agents, and automation from a single dashboard.
This guide will walk you through account creation → setup → pricing → WhatsApp integration → team & contacts management.
1️⃣ Create Your WhatzCRM Account (Admin Registration)
Page: Get Started – Admin Registration
This is the first step to access WhatzCRM.

Steps:
- Open the WhatzCRM registration page.
- Enter the following details:
- First Name
- Last Name
- Username
- Email Address
- Password
- Click Next Step.
✅ This creates your Admin account, which will control the entire organization.
🔐 Tip: Use a valid email address, as it will be used for login and future communication.
2️⃣ Organization Setup
Page: Organization Setup
In this step, you configure your business details.
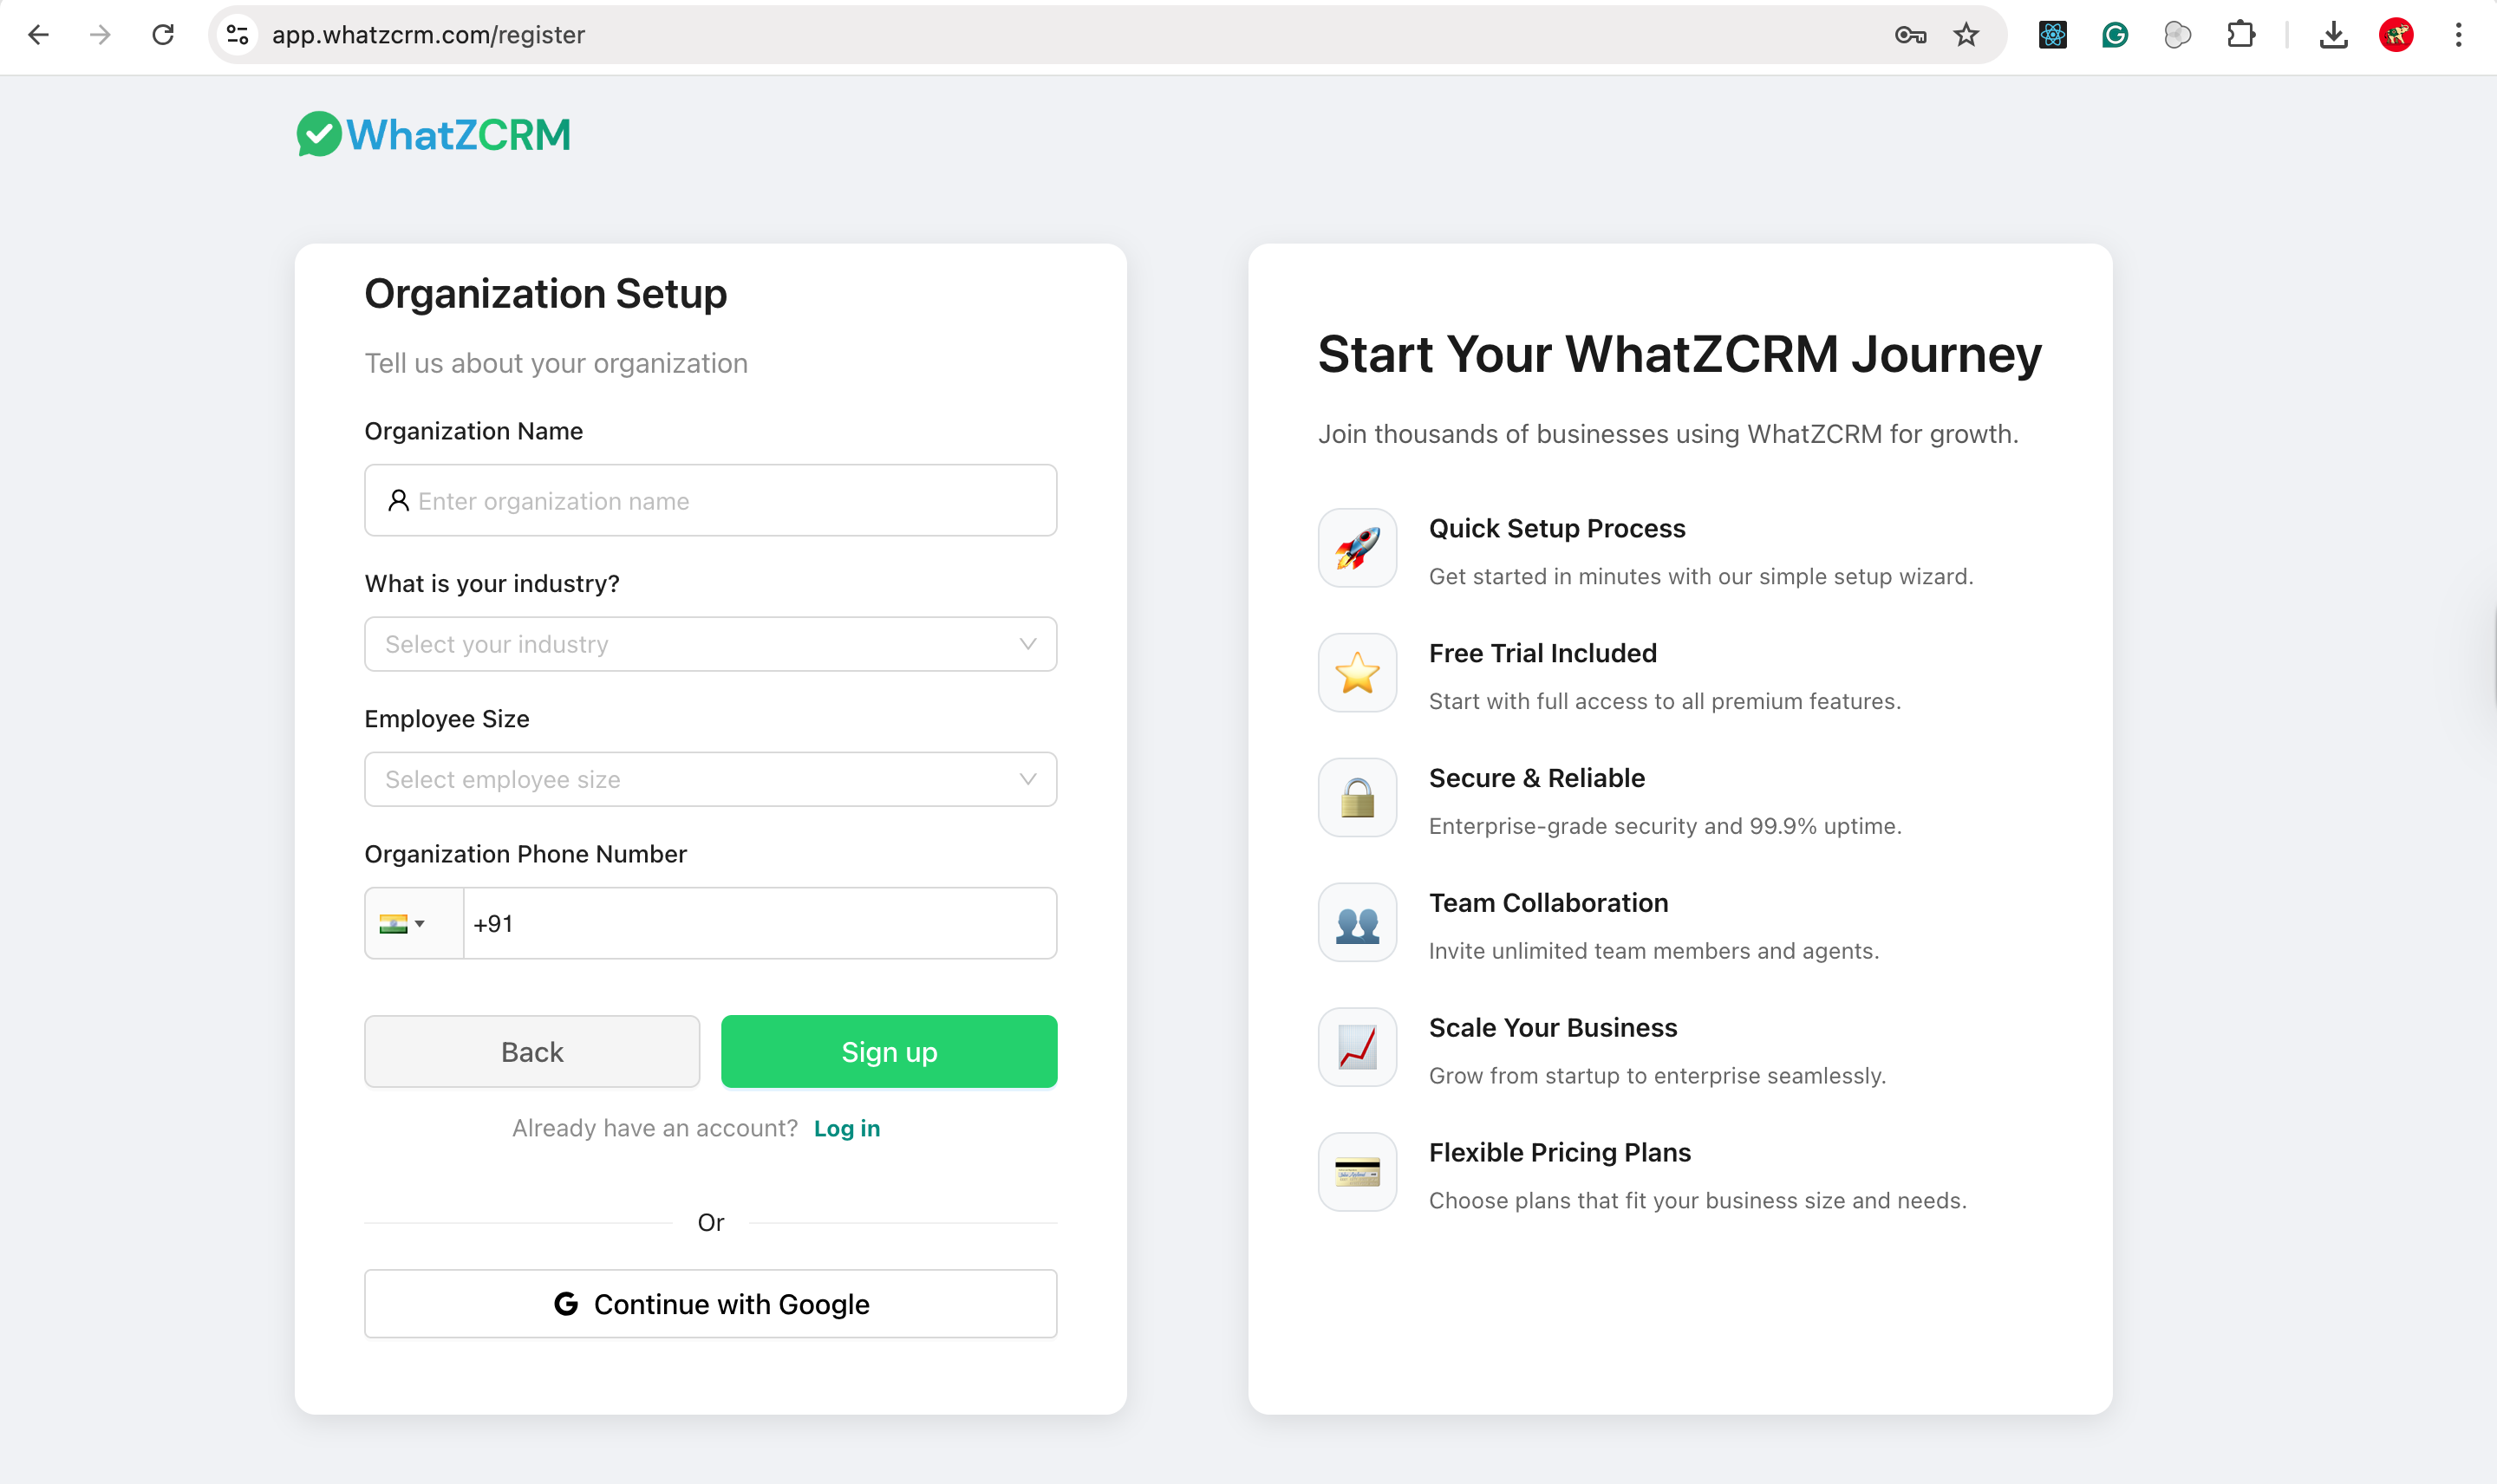
Steps:
- Enter your Organization Name.
- Select your Industry.
- Choose Employee Size.
- Enter your Organization Phone Number.
- Click Sign up.
✅ Your organization is now successfully created inside WhatzCRM.
📌 One admin account = One organization workspace.
3️⃣ Login to WhatzCRM
Page: Admin Login
Use this page to access your dashboard anytime.
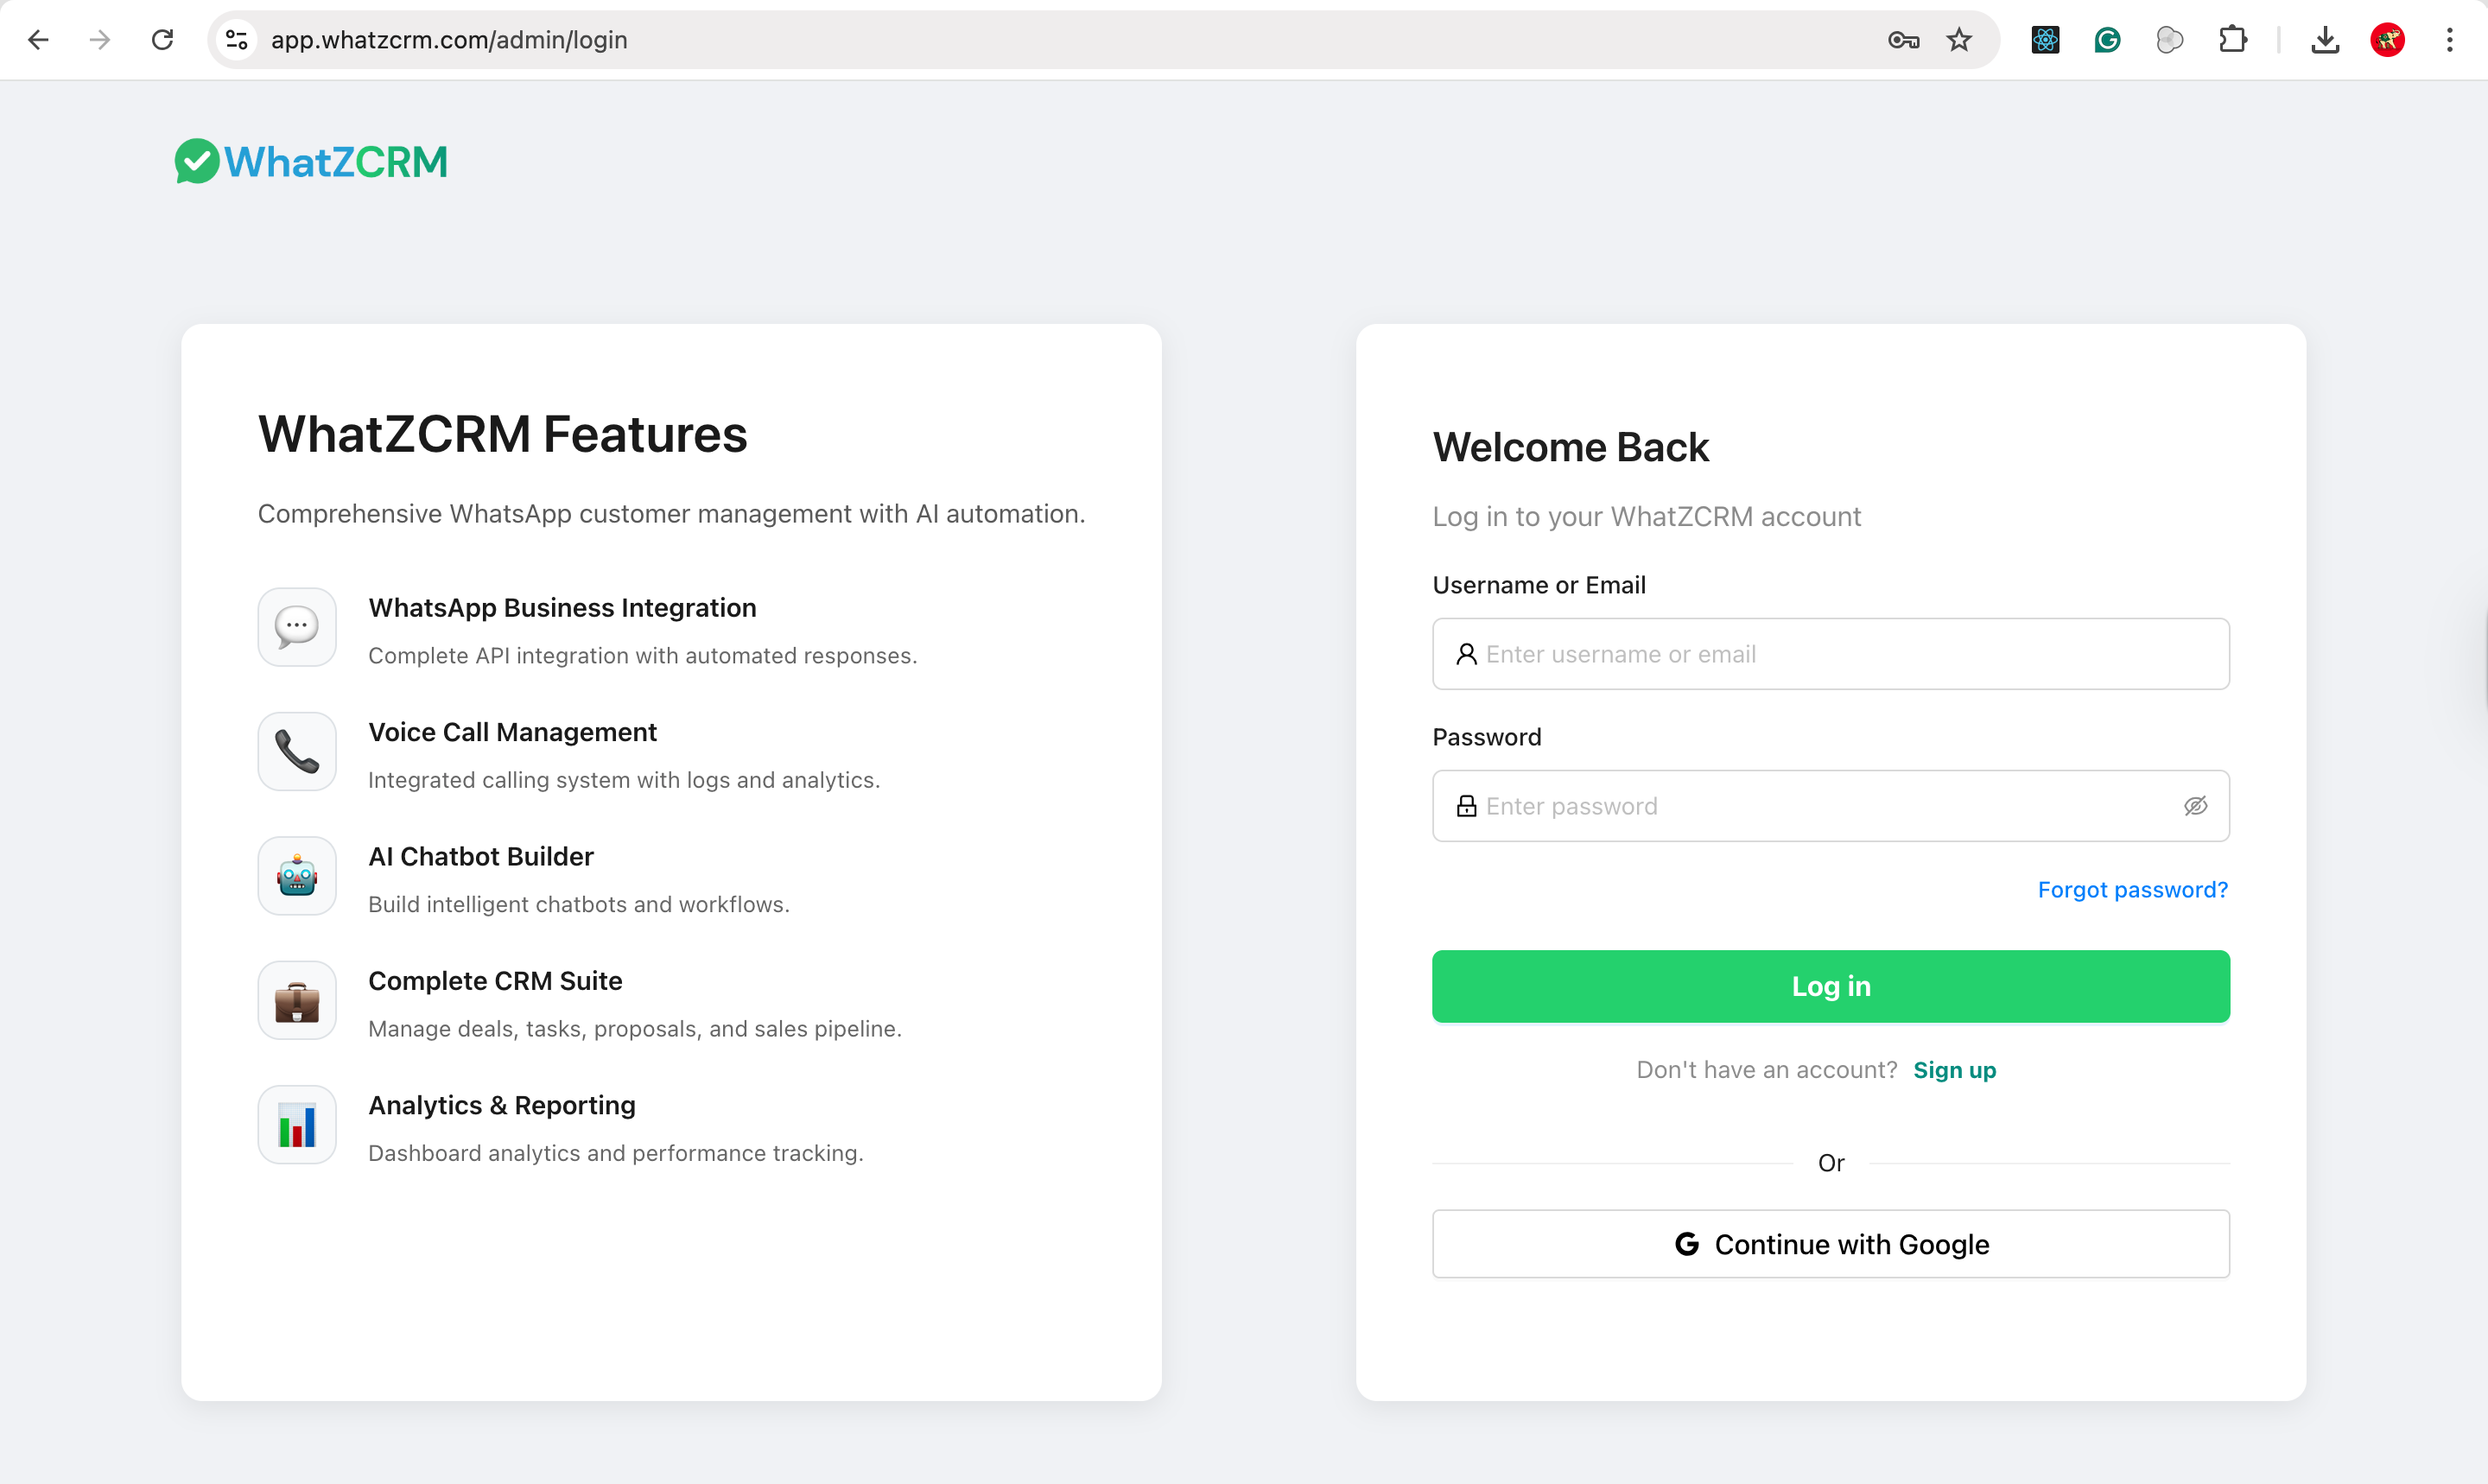
Steps:
- Enter your Username or Email.
- Enter your Password.
- Click Log in.
🔑 Alternative: You can also log in using Continue with Google for faster access.
4️⃣ Choose a Pricing Plan
Page: Pricing
WhatzCRM offers flexible plans based on your business size.
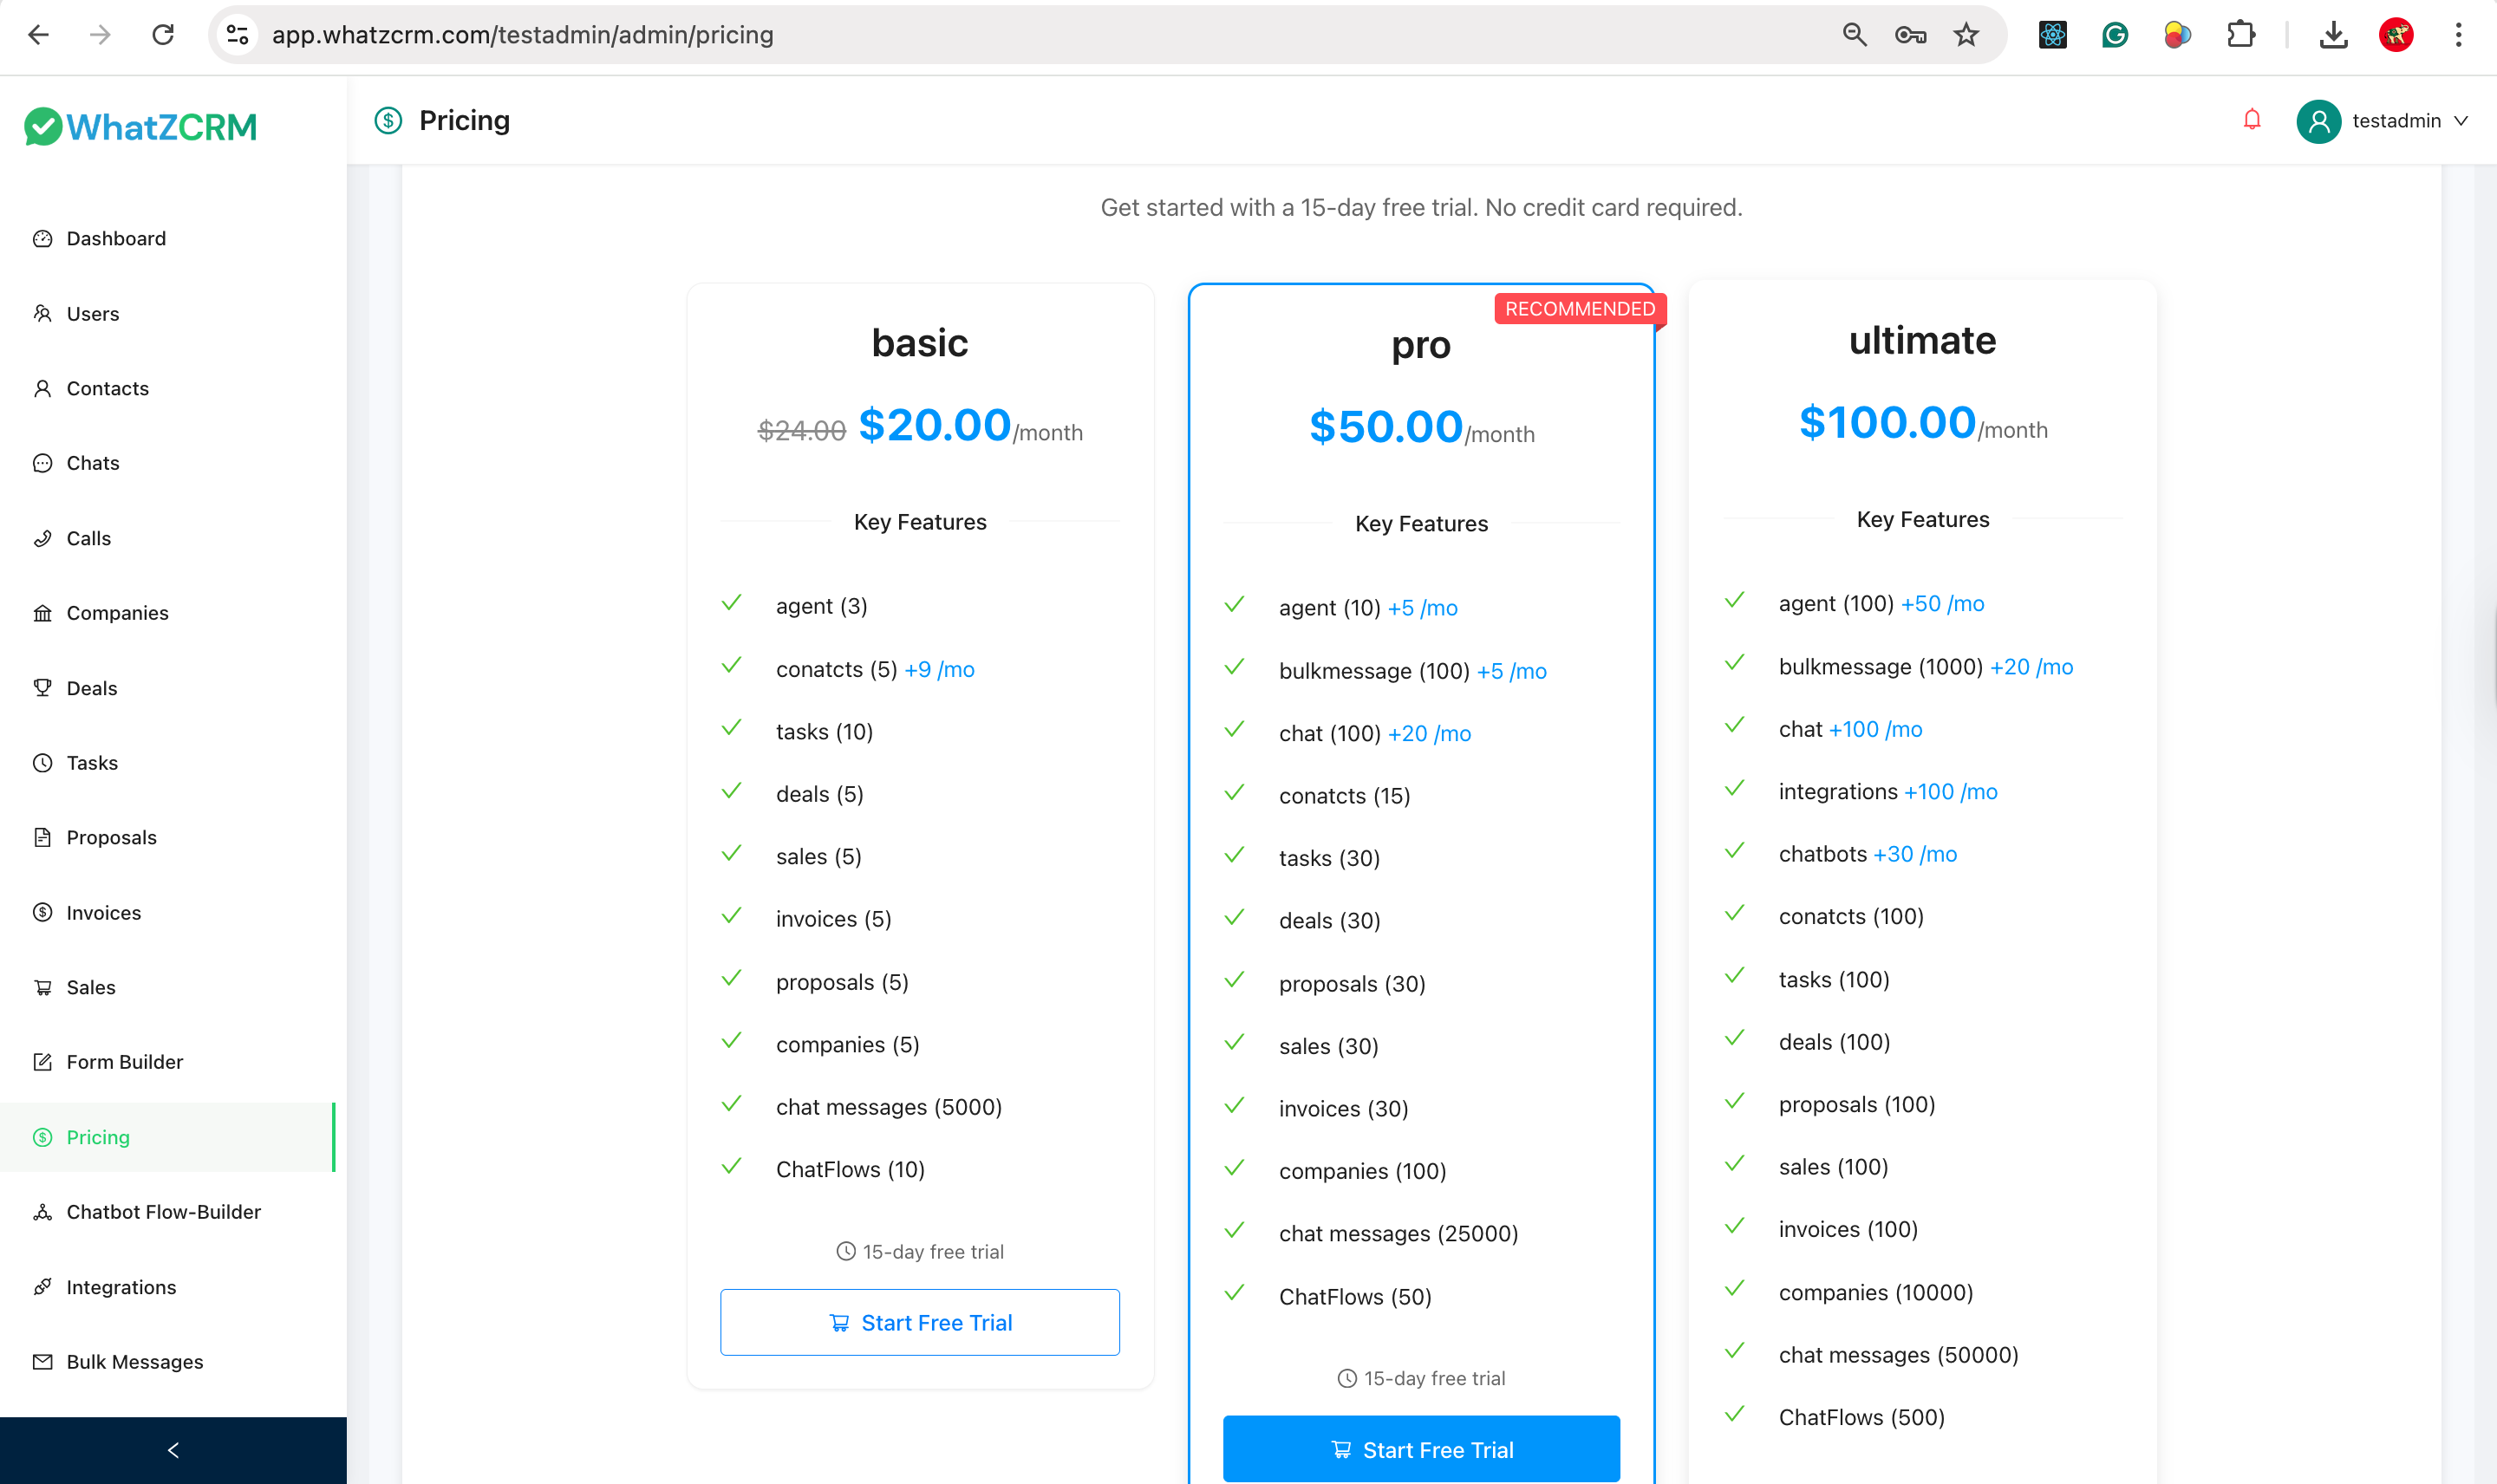
Available Plans:
- Basic – For small teams
- Pro (Recommended) – For growing businesses
- Ultimate – For enterprises & high-volume usage
How to choose:
- Review limits like:
- Number of agents
- Contacts
- Chat messages
- ChatFlows
- Click Start Free Trial on your preferred plan.
🎉 Every plan includes a 15-day free trial (No credit card required).
5️⃣ Configure WhatsApp Business API (Meta Integration)
Page: Settings → WhatsApp Numbers
This is a mandatory step to start WhatsApp messaging.
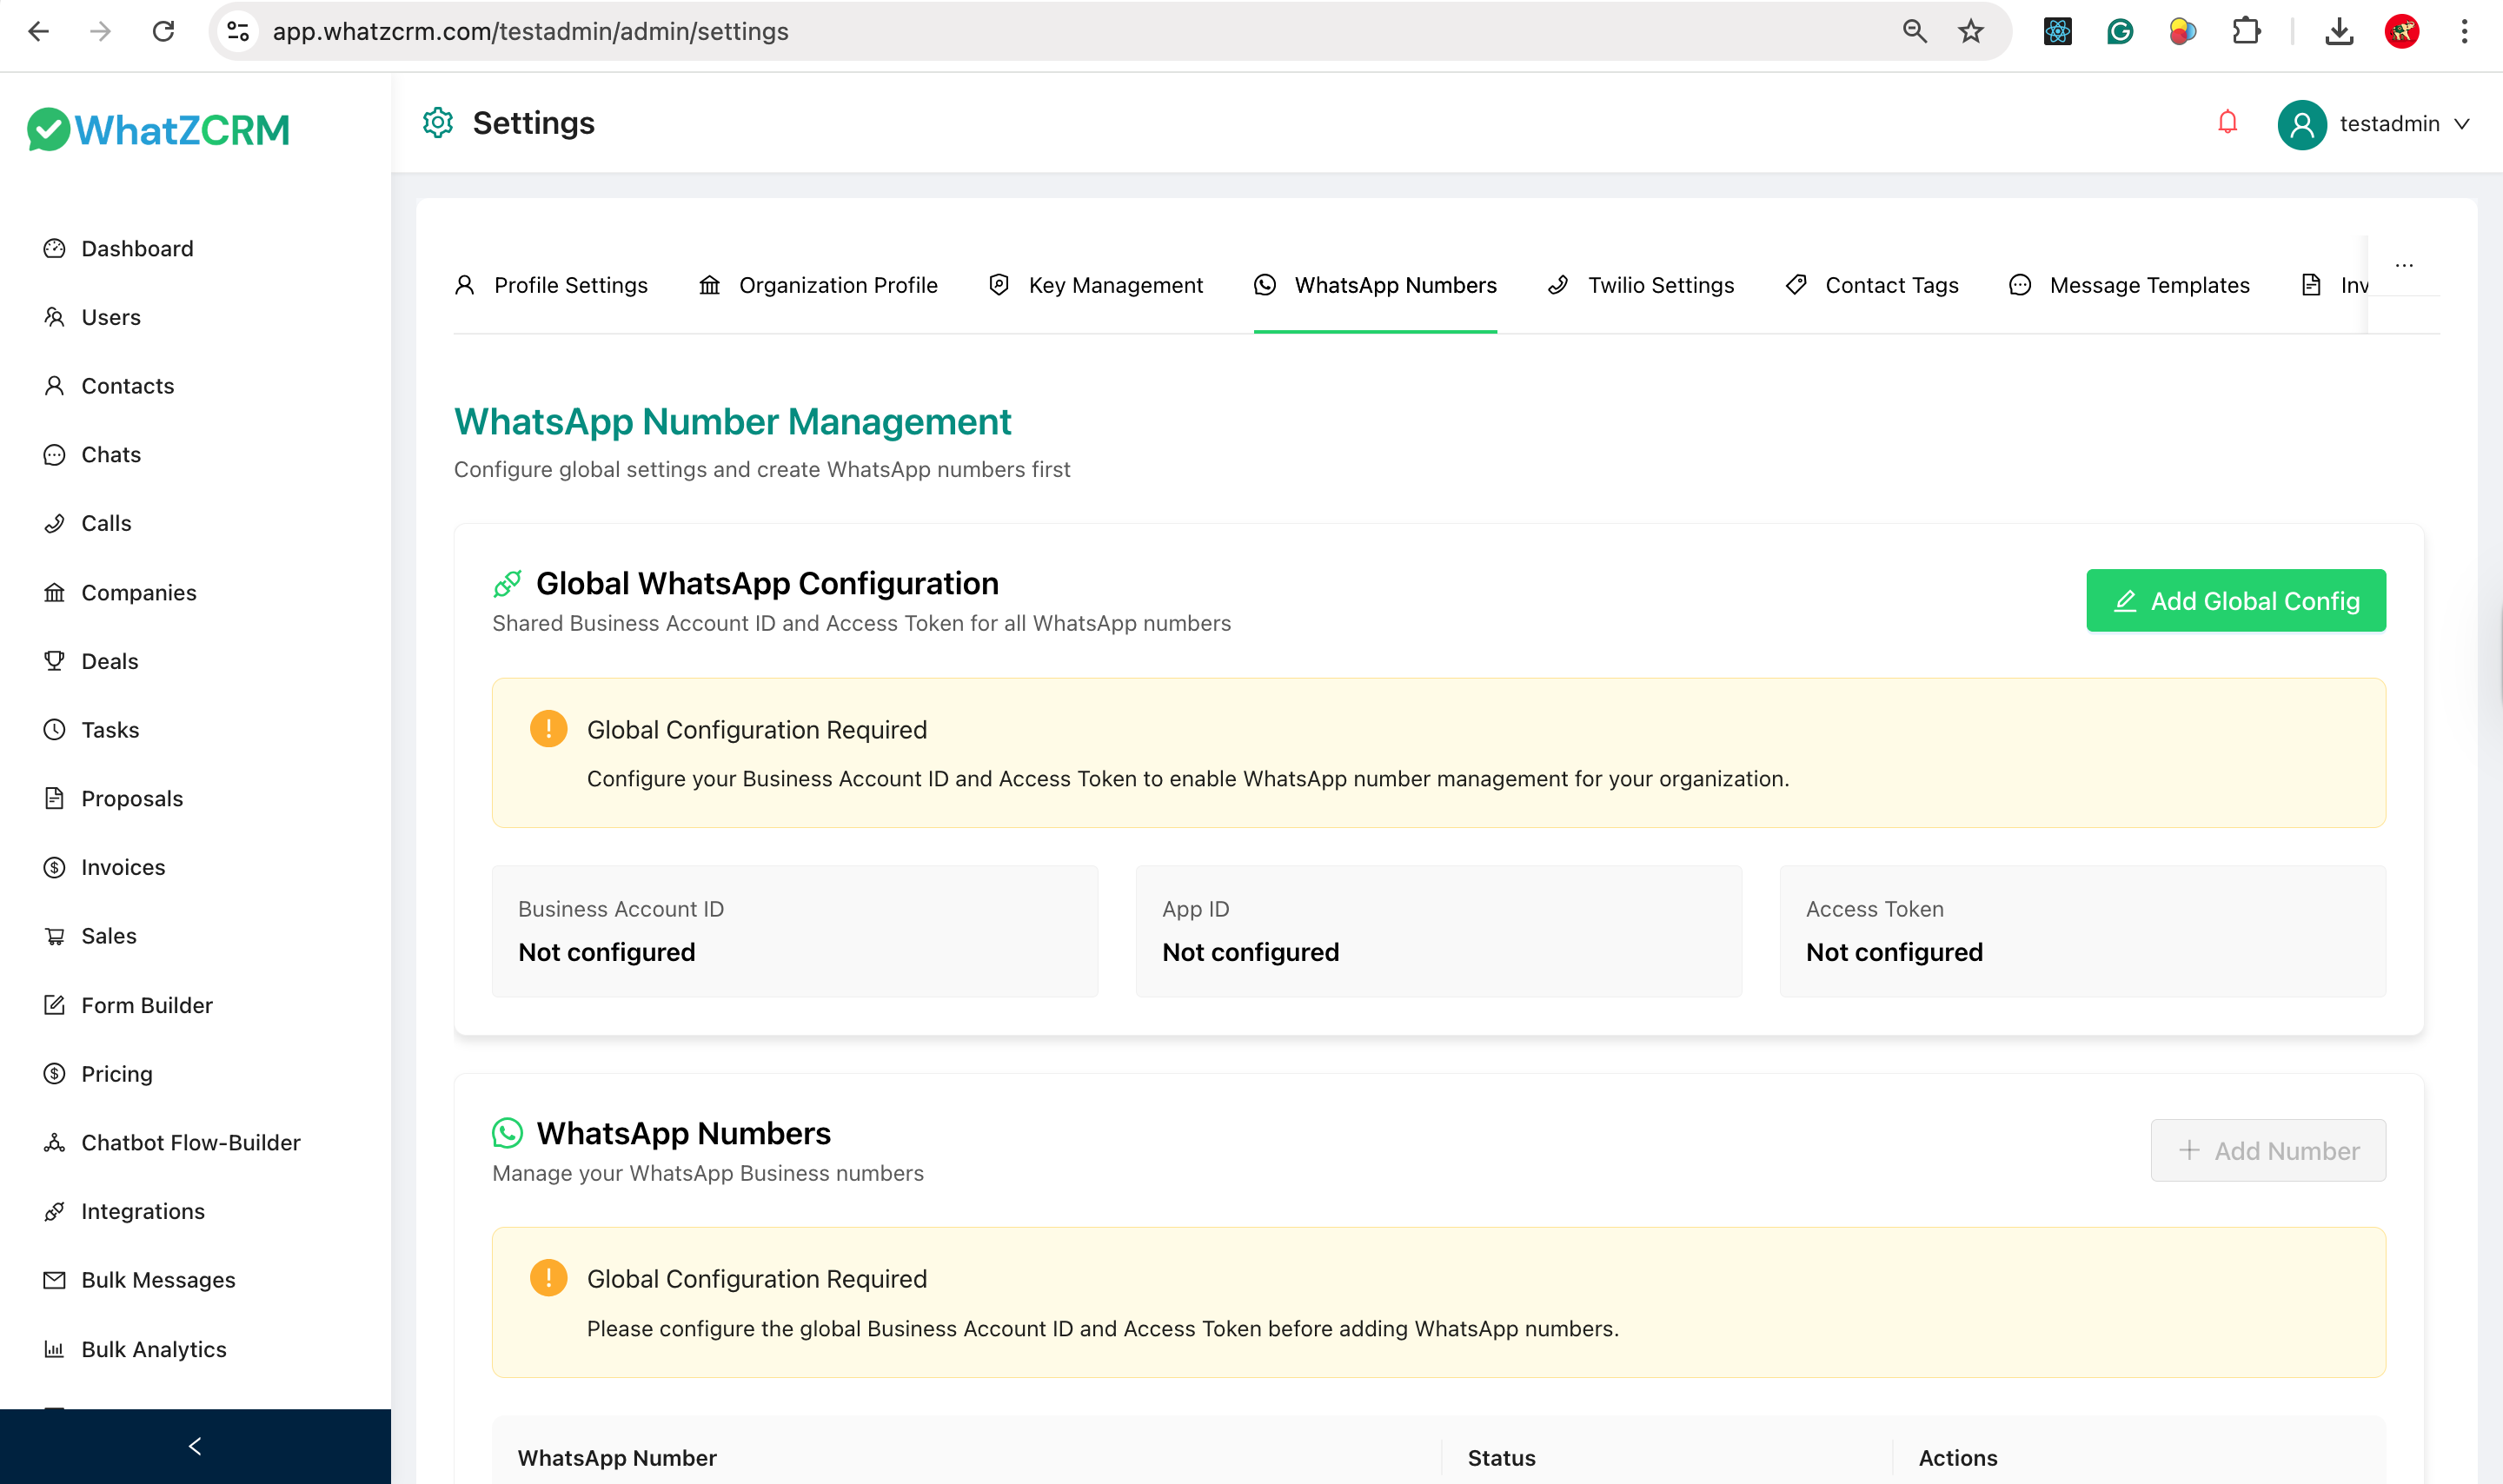
Why this is required:
WhatzCRM connects directly with Meta WhatsApp Business API.
Steps:
- Go to Settings.
- Open WhatsApp Numbers.
- Click Add Global Config.
- Enter:
- Business Account ID
- App ID
- Access Token
- Save the configuration.
✅ Once configured, WhatsApp number management is enabled.
⚠️ Until this step is completed, you cannot add WhatsApp numbers or send messages.
6️⃣ Add & Manage Agents (Team Members)
Page: Users → Agents
Agents are the people who handle customer chats and calls.
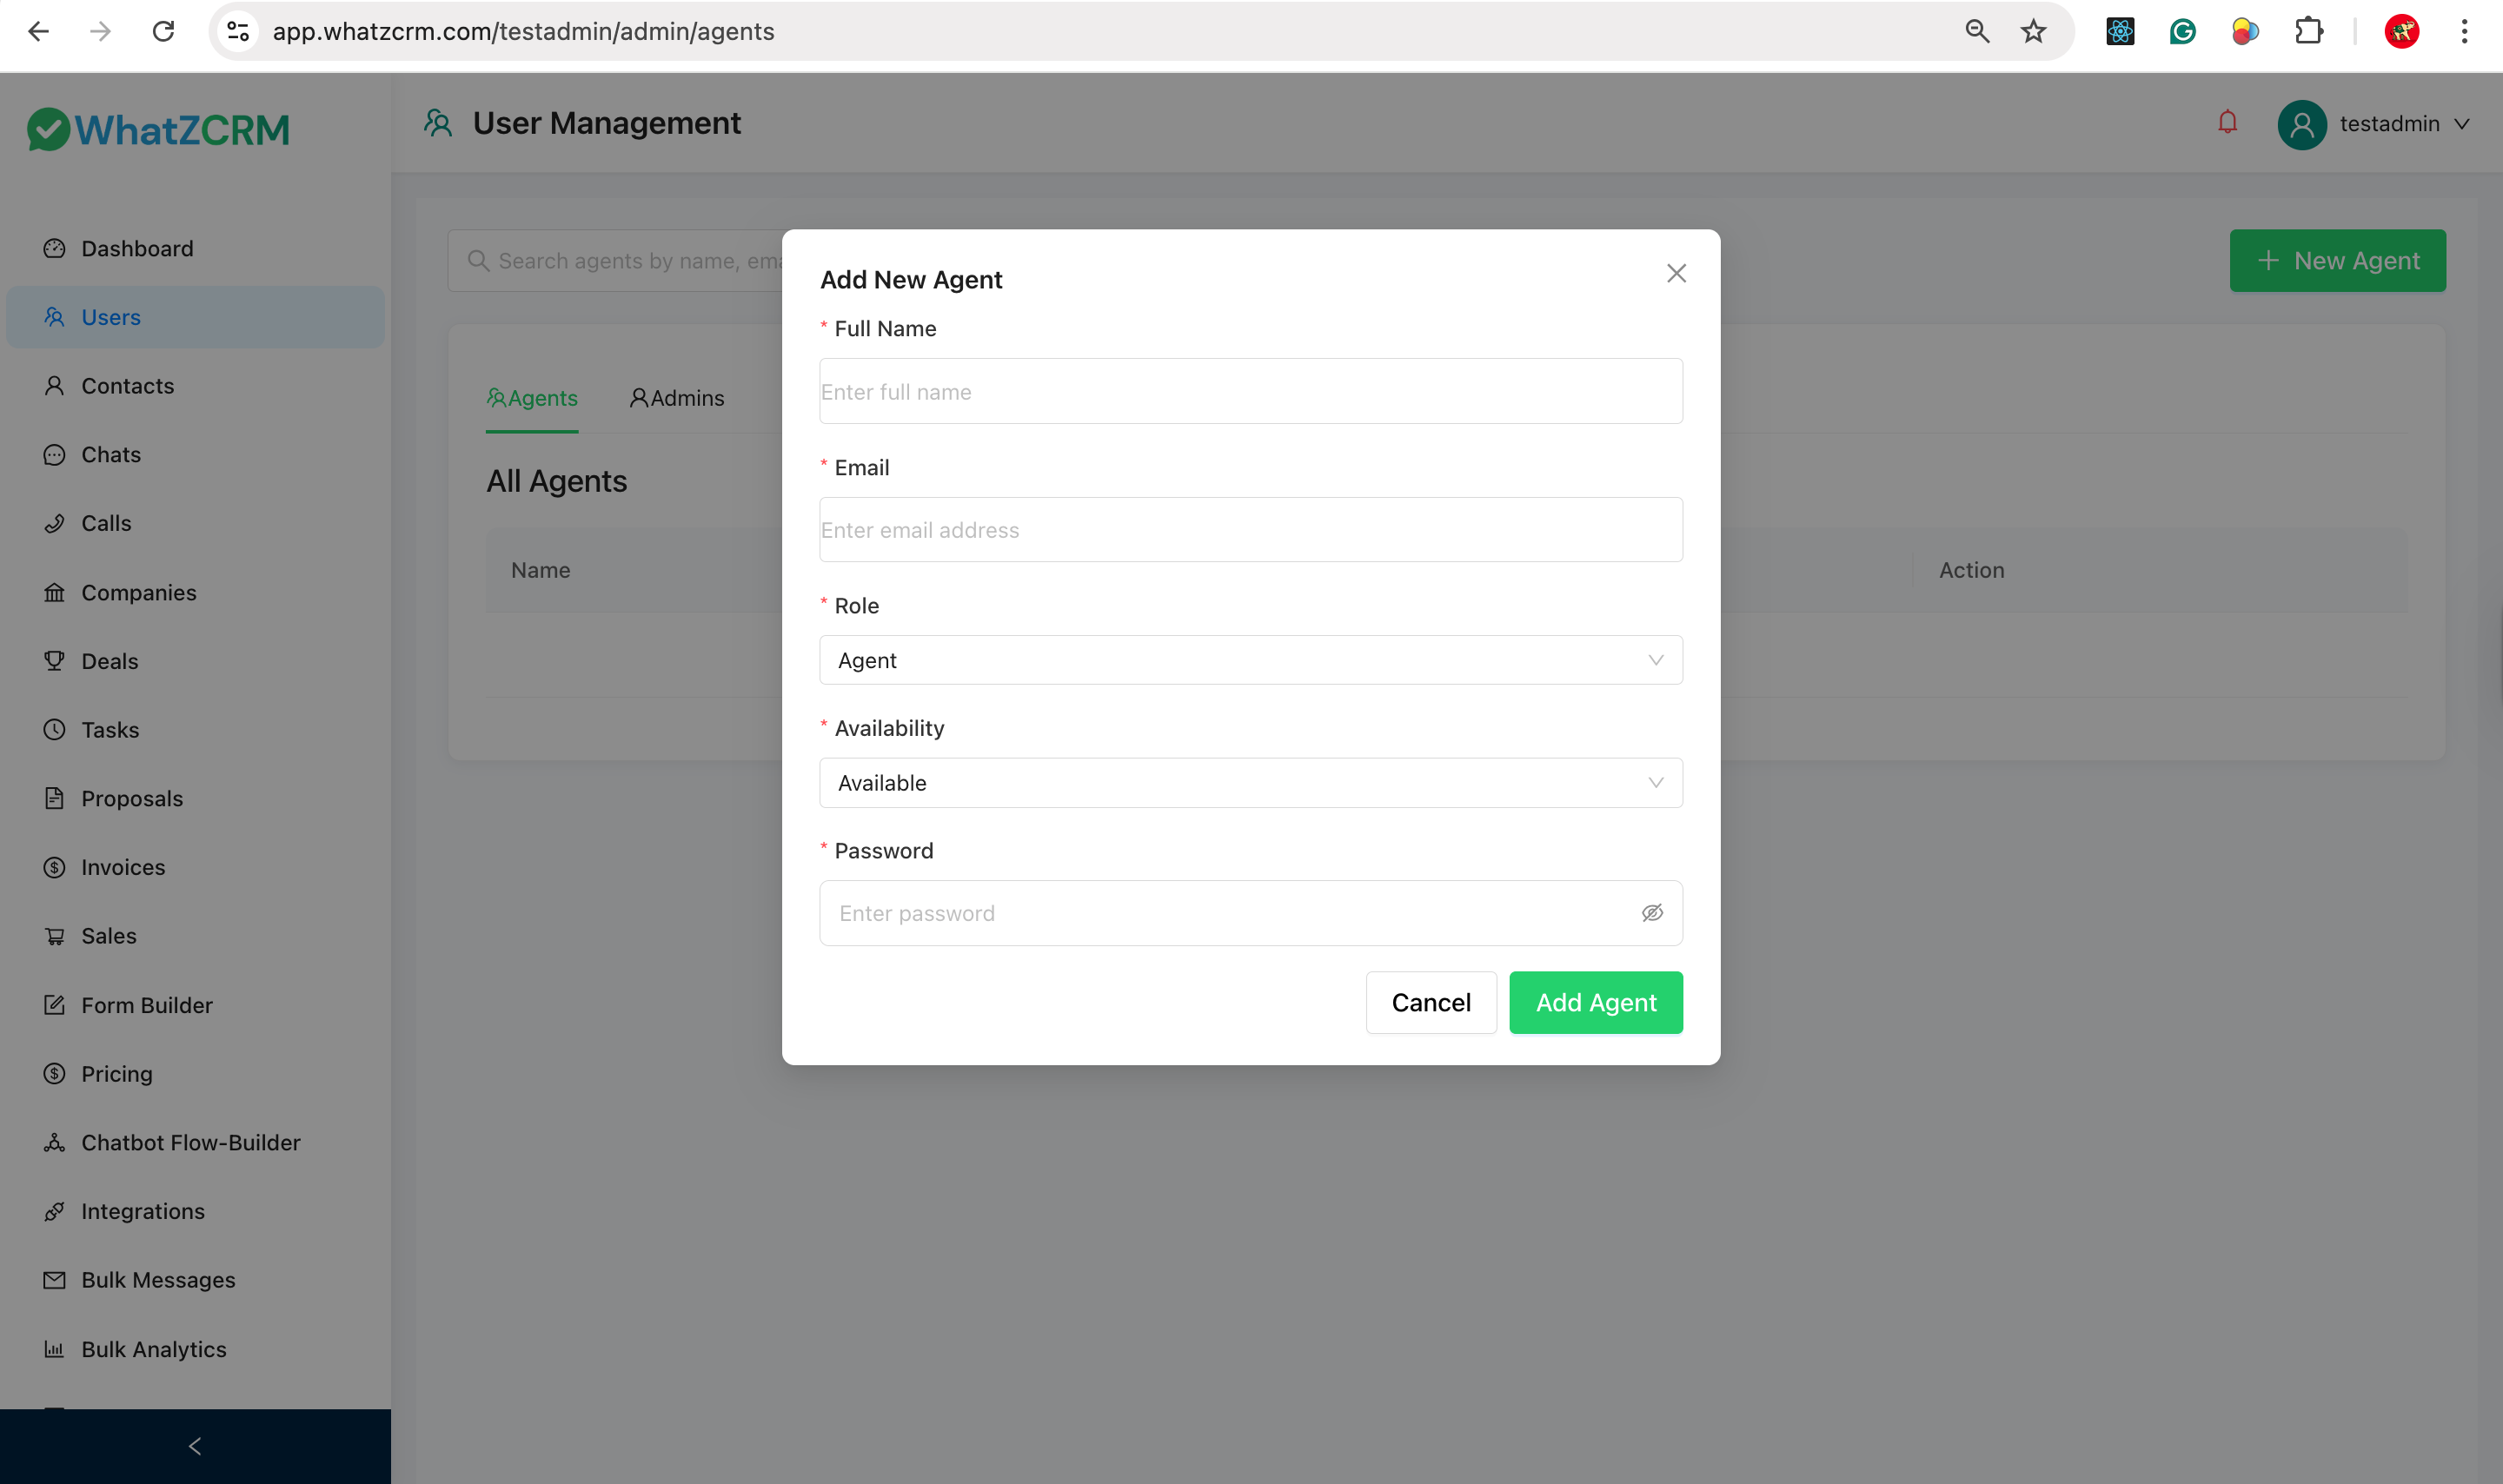
Steps to add an agent:
- Click + New Agent.
- Fill in:
- Full Name
- Role (Agent/Admin)
- Availability status
- Password
- Click Add Agent.
👥 You can add multiple agents based on your plan limits.
7️⃣ Import Contacts (Bulk Upload)
Page: Contacts → Import CSV
Use this feature to upload contacts in bulk.
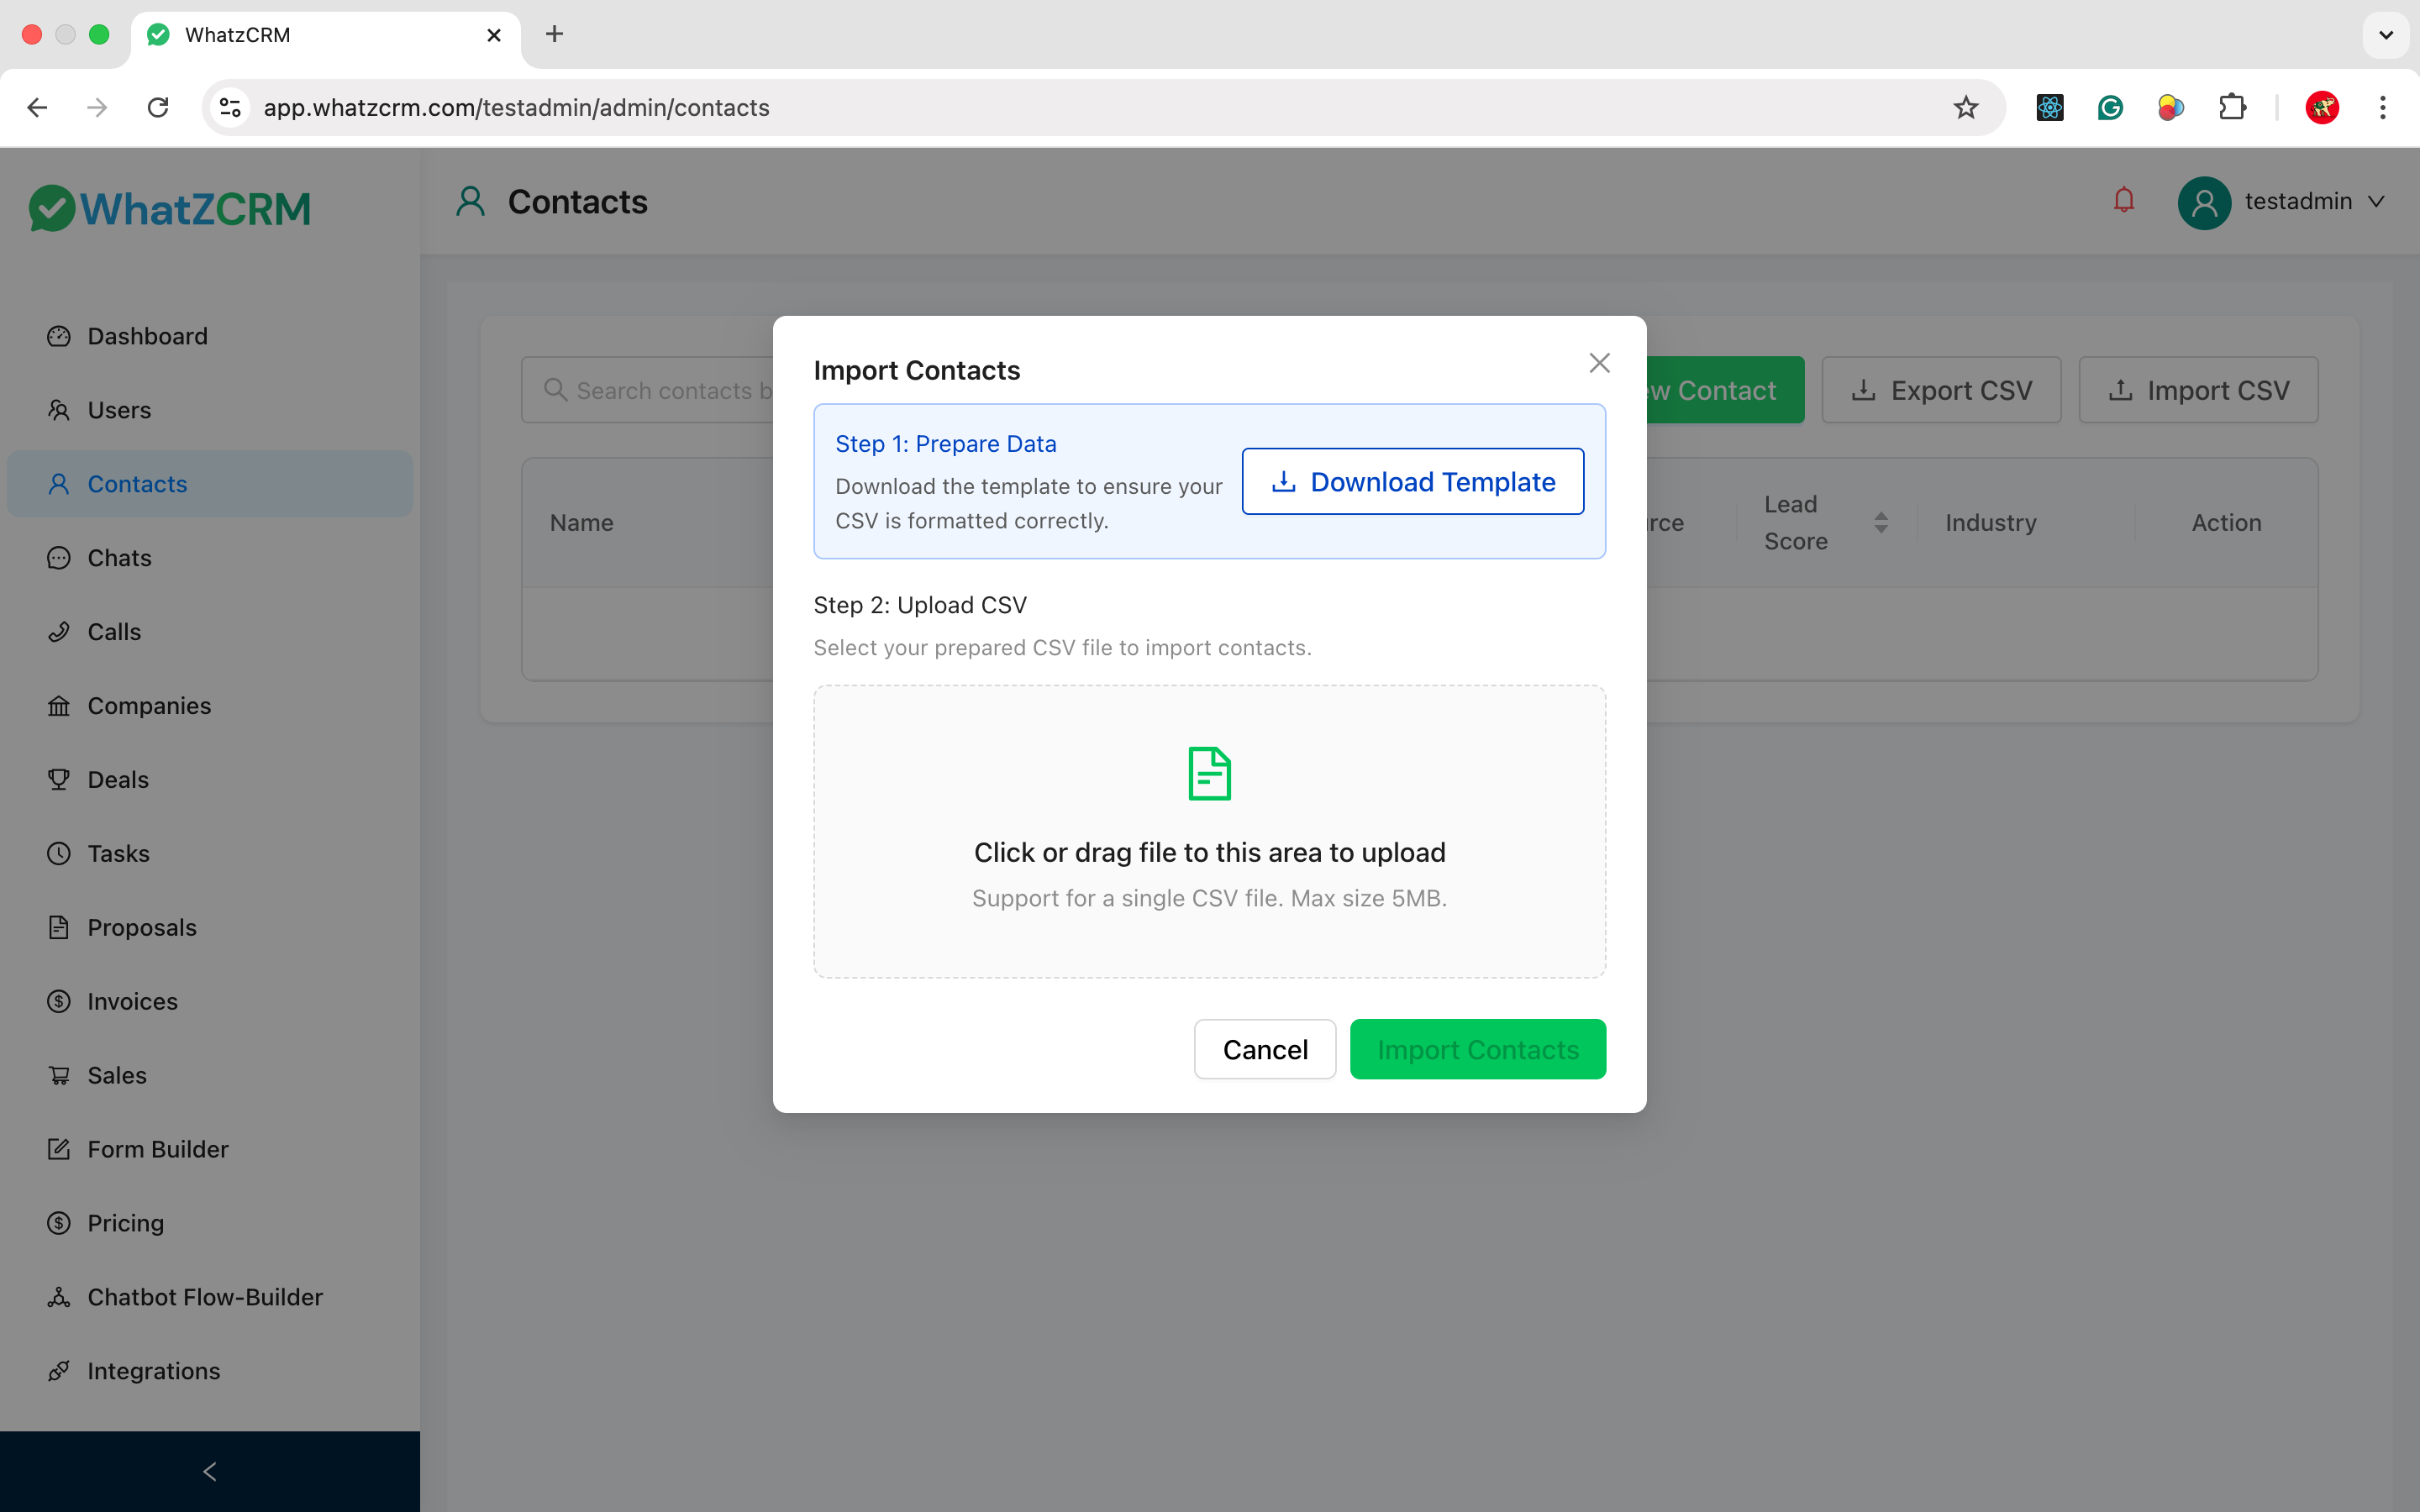
Steps:
- Click Import CSV.
- Download the provided CSV Template.
- Fill customer data in the template.
- Upload the completed CSV file.
- Click Import Contacts.
📄 Supported: * Single CSV file * Max size: 5MB
8️⃣ Add & Manage Contacts Manually
Page: Contacts Dashboard
This is where all your customer data lives.
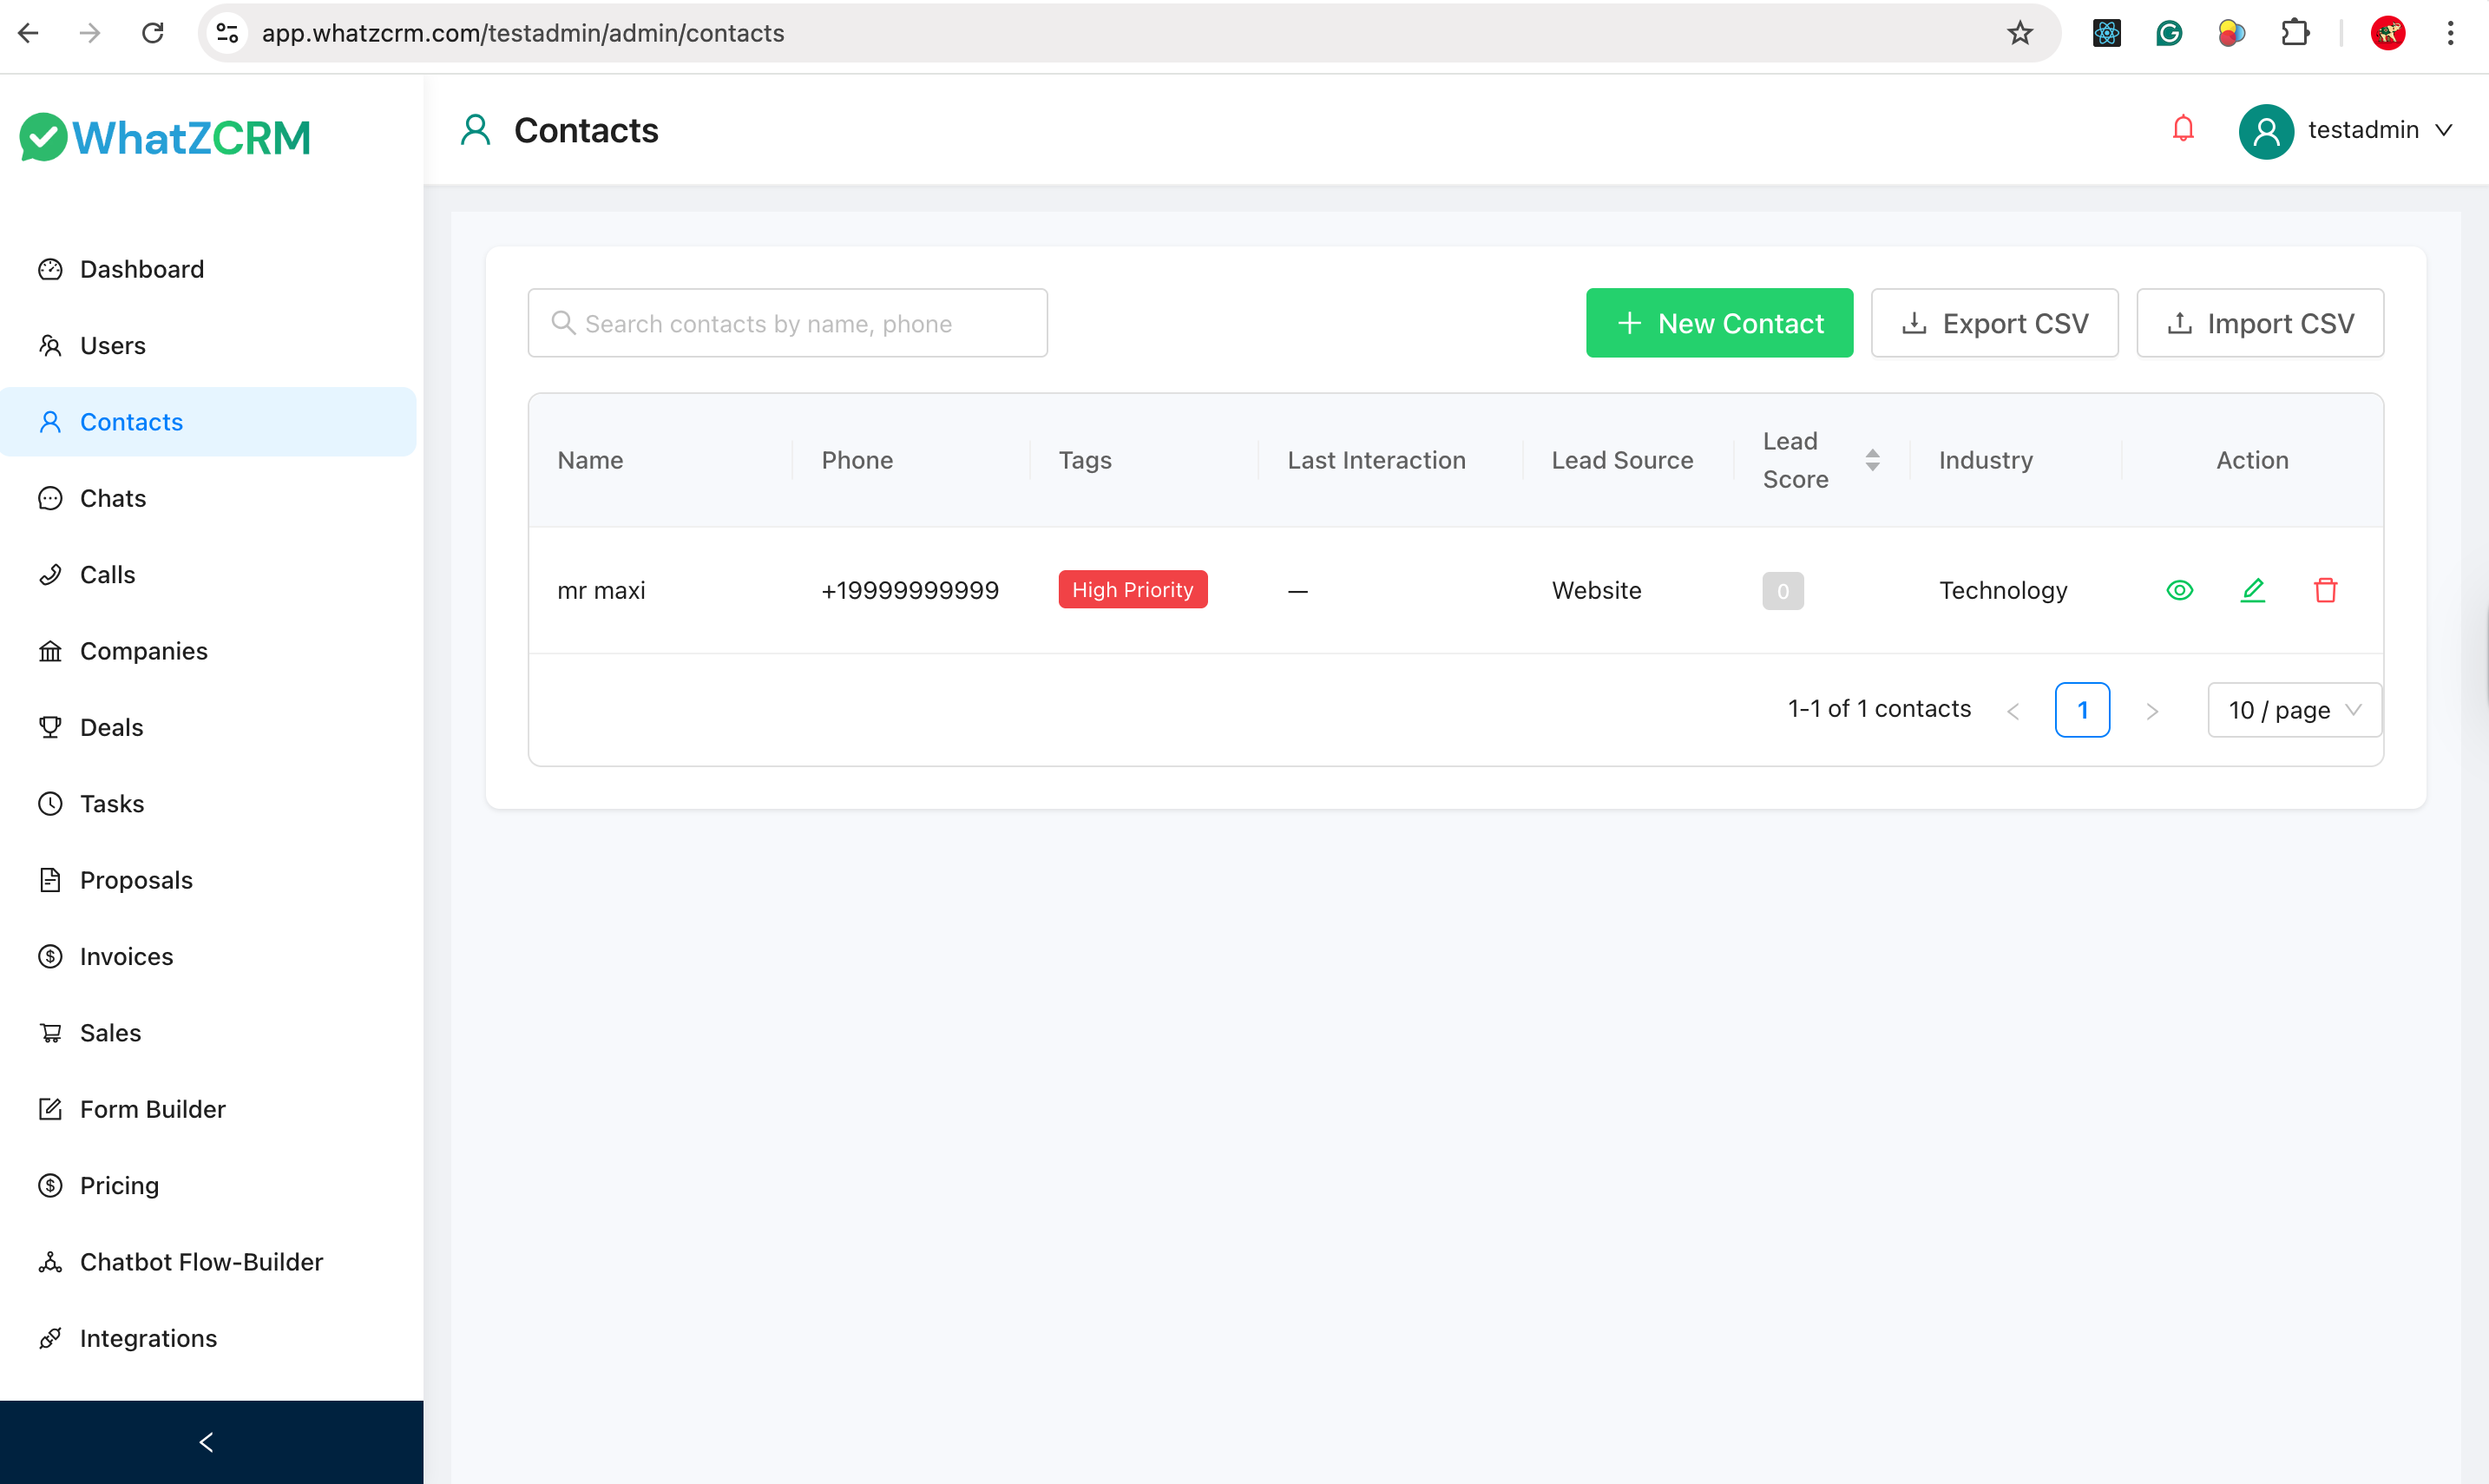
Features:
- View contact name & phone number.
- Assign tags (e.g., High Priority).
- Track last interaction.
- See lead source & lead score.
- Edit or delete contacts.
To add a contact manually:
- Click + New Contact.
- Enter customer details.
- Save.
📊 Contacts help you organize conversations and improve follow-ups.
9️⃣ Bulk WhatsApp Messaging (Campaigns)
Page: Dashboard → Bulk Messages → Bulk WhatsApp Messaging
Bulk WhatsApp Messaging in WhatzCRM allows you to send WhatsApp template messages to multiple contacts at once, filtered by tags such as High Priority, VIP, New Lead, etc.
This feature is ideal for: * Promotions & offers * Notifications * Announcements * Follow-ups * Marketing campaigns
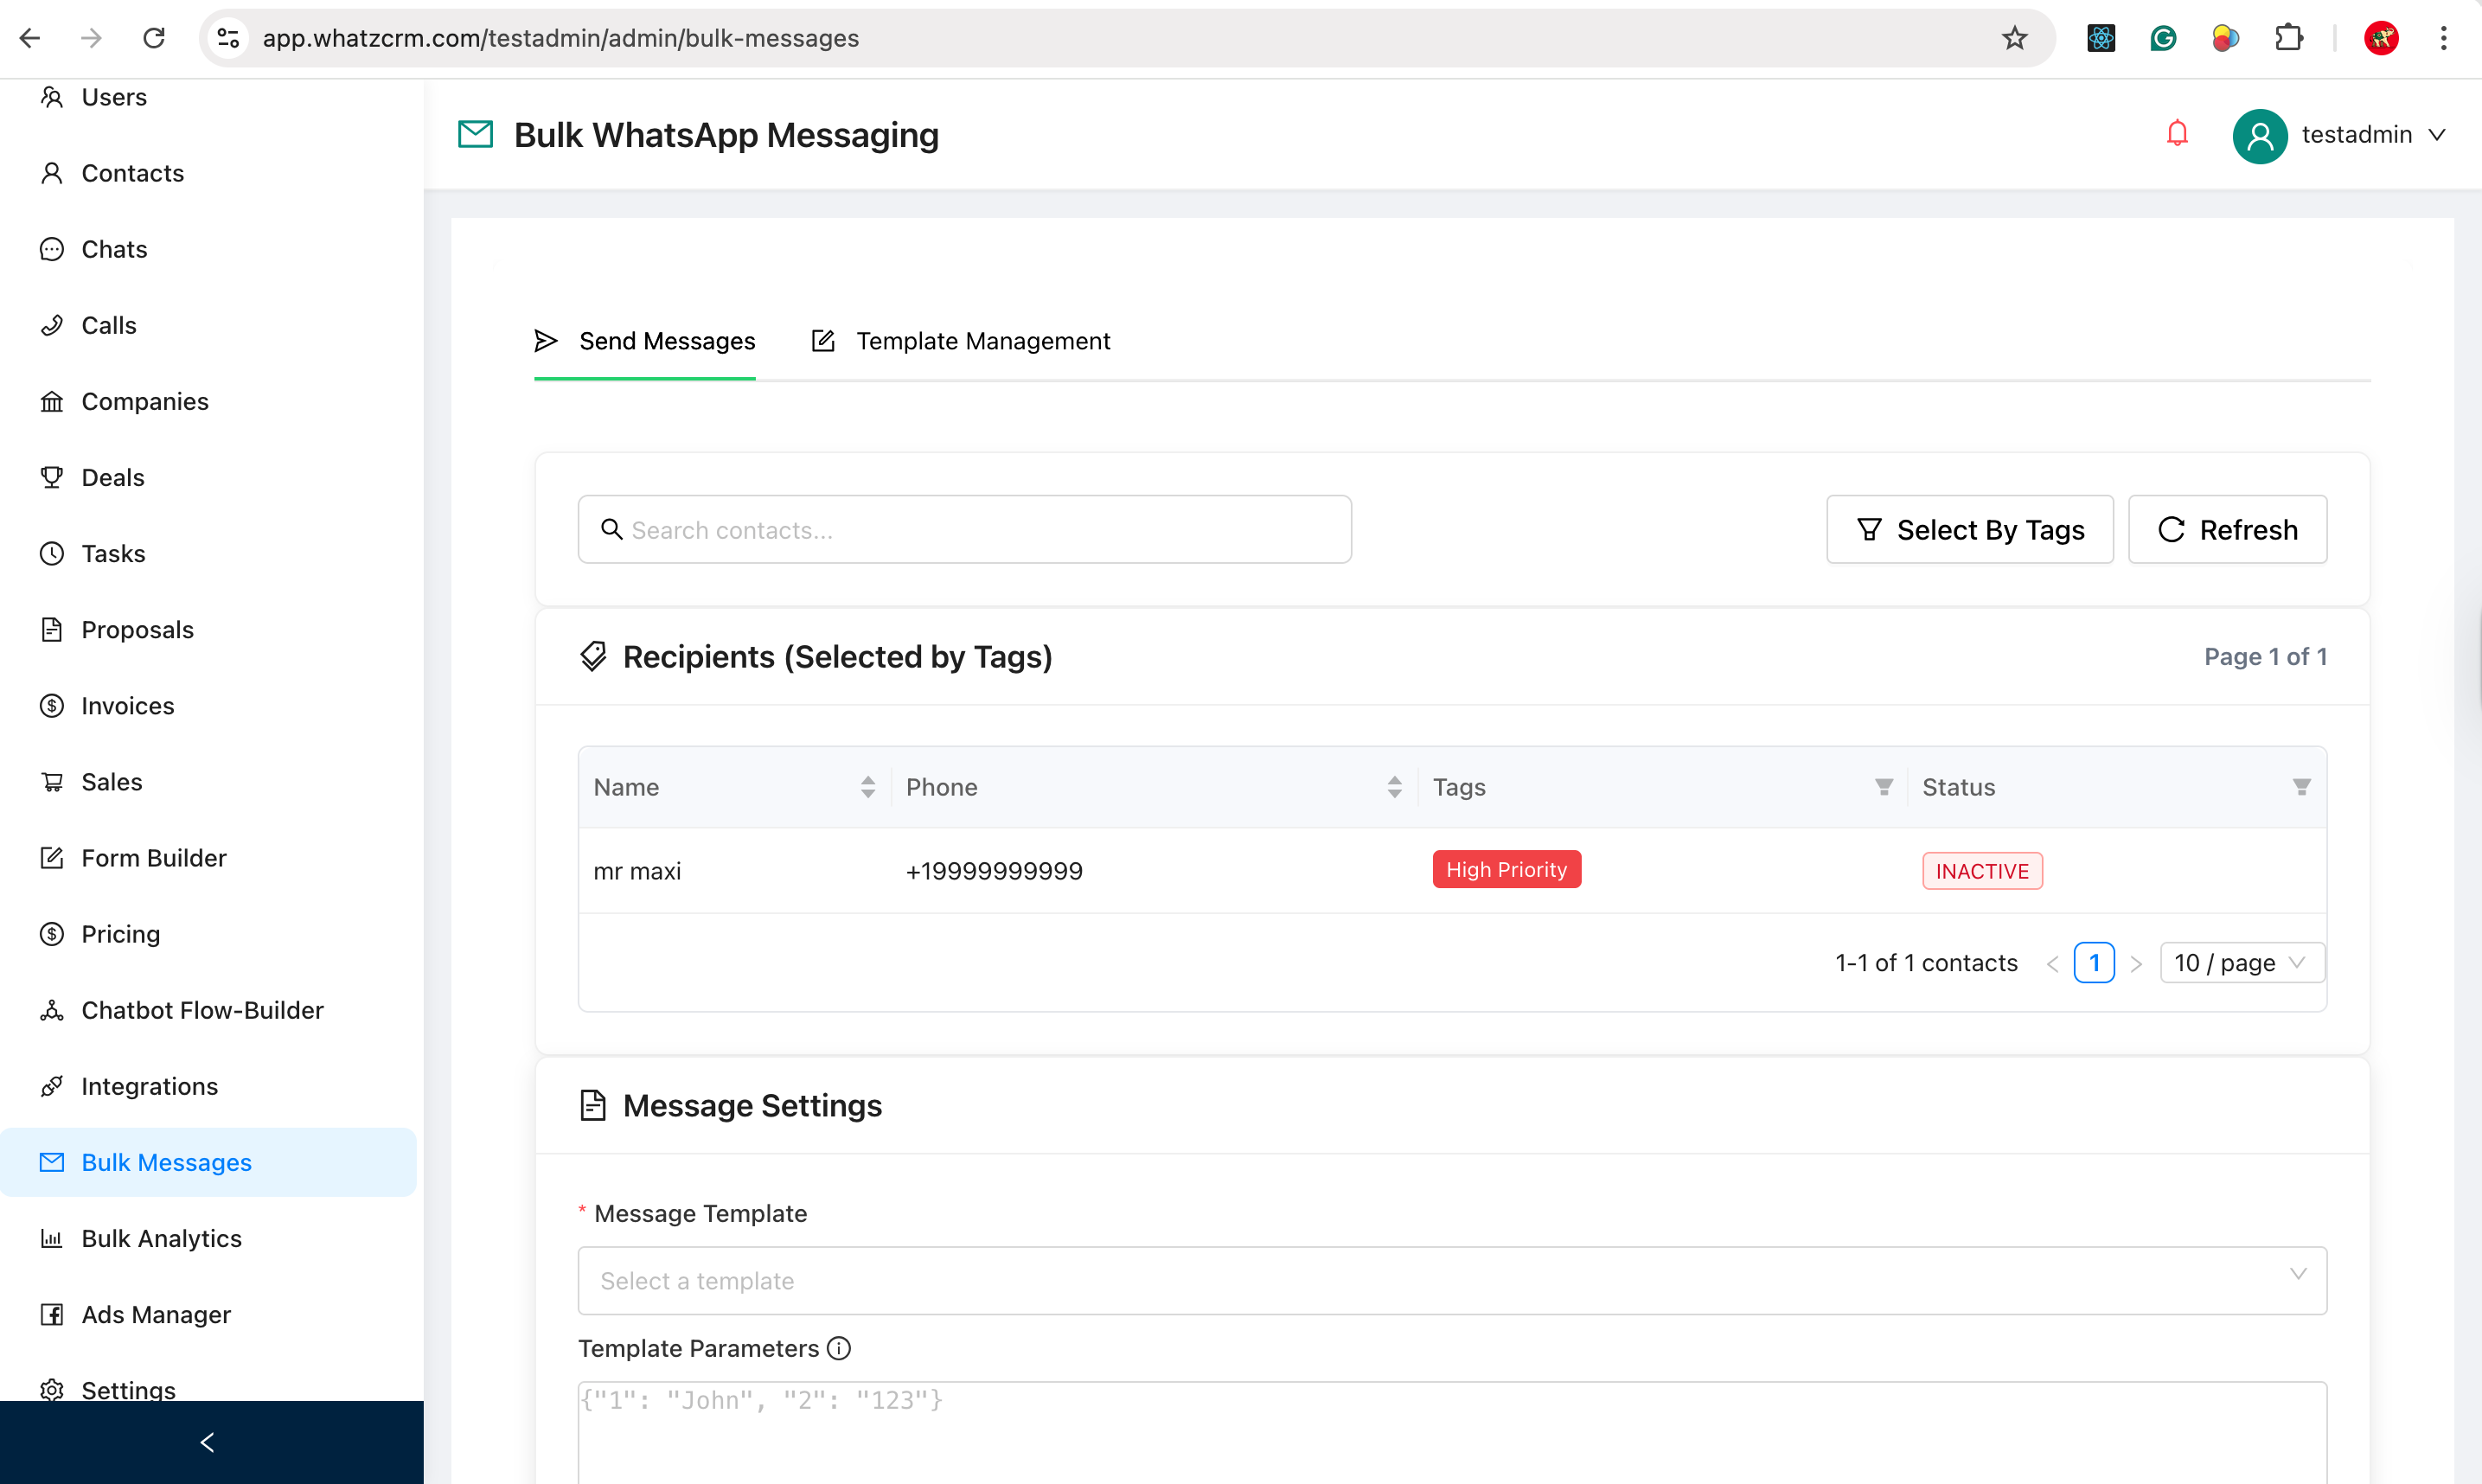
1. Select Contacts Using Tags
Page Section: Recipients (Selected by Tags)
Instead of manually selecting contacts, WhatzCRM lets you target contacts using tags.
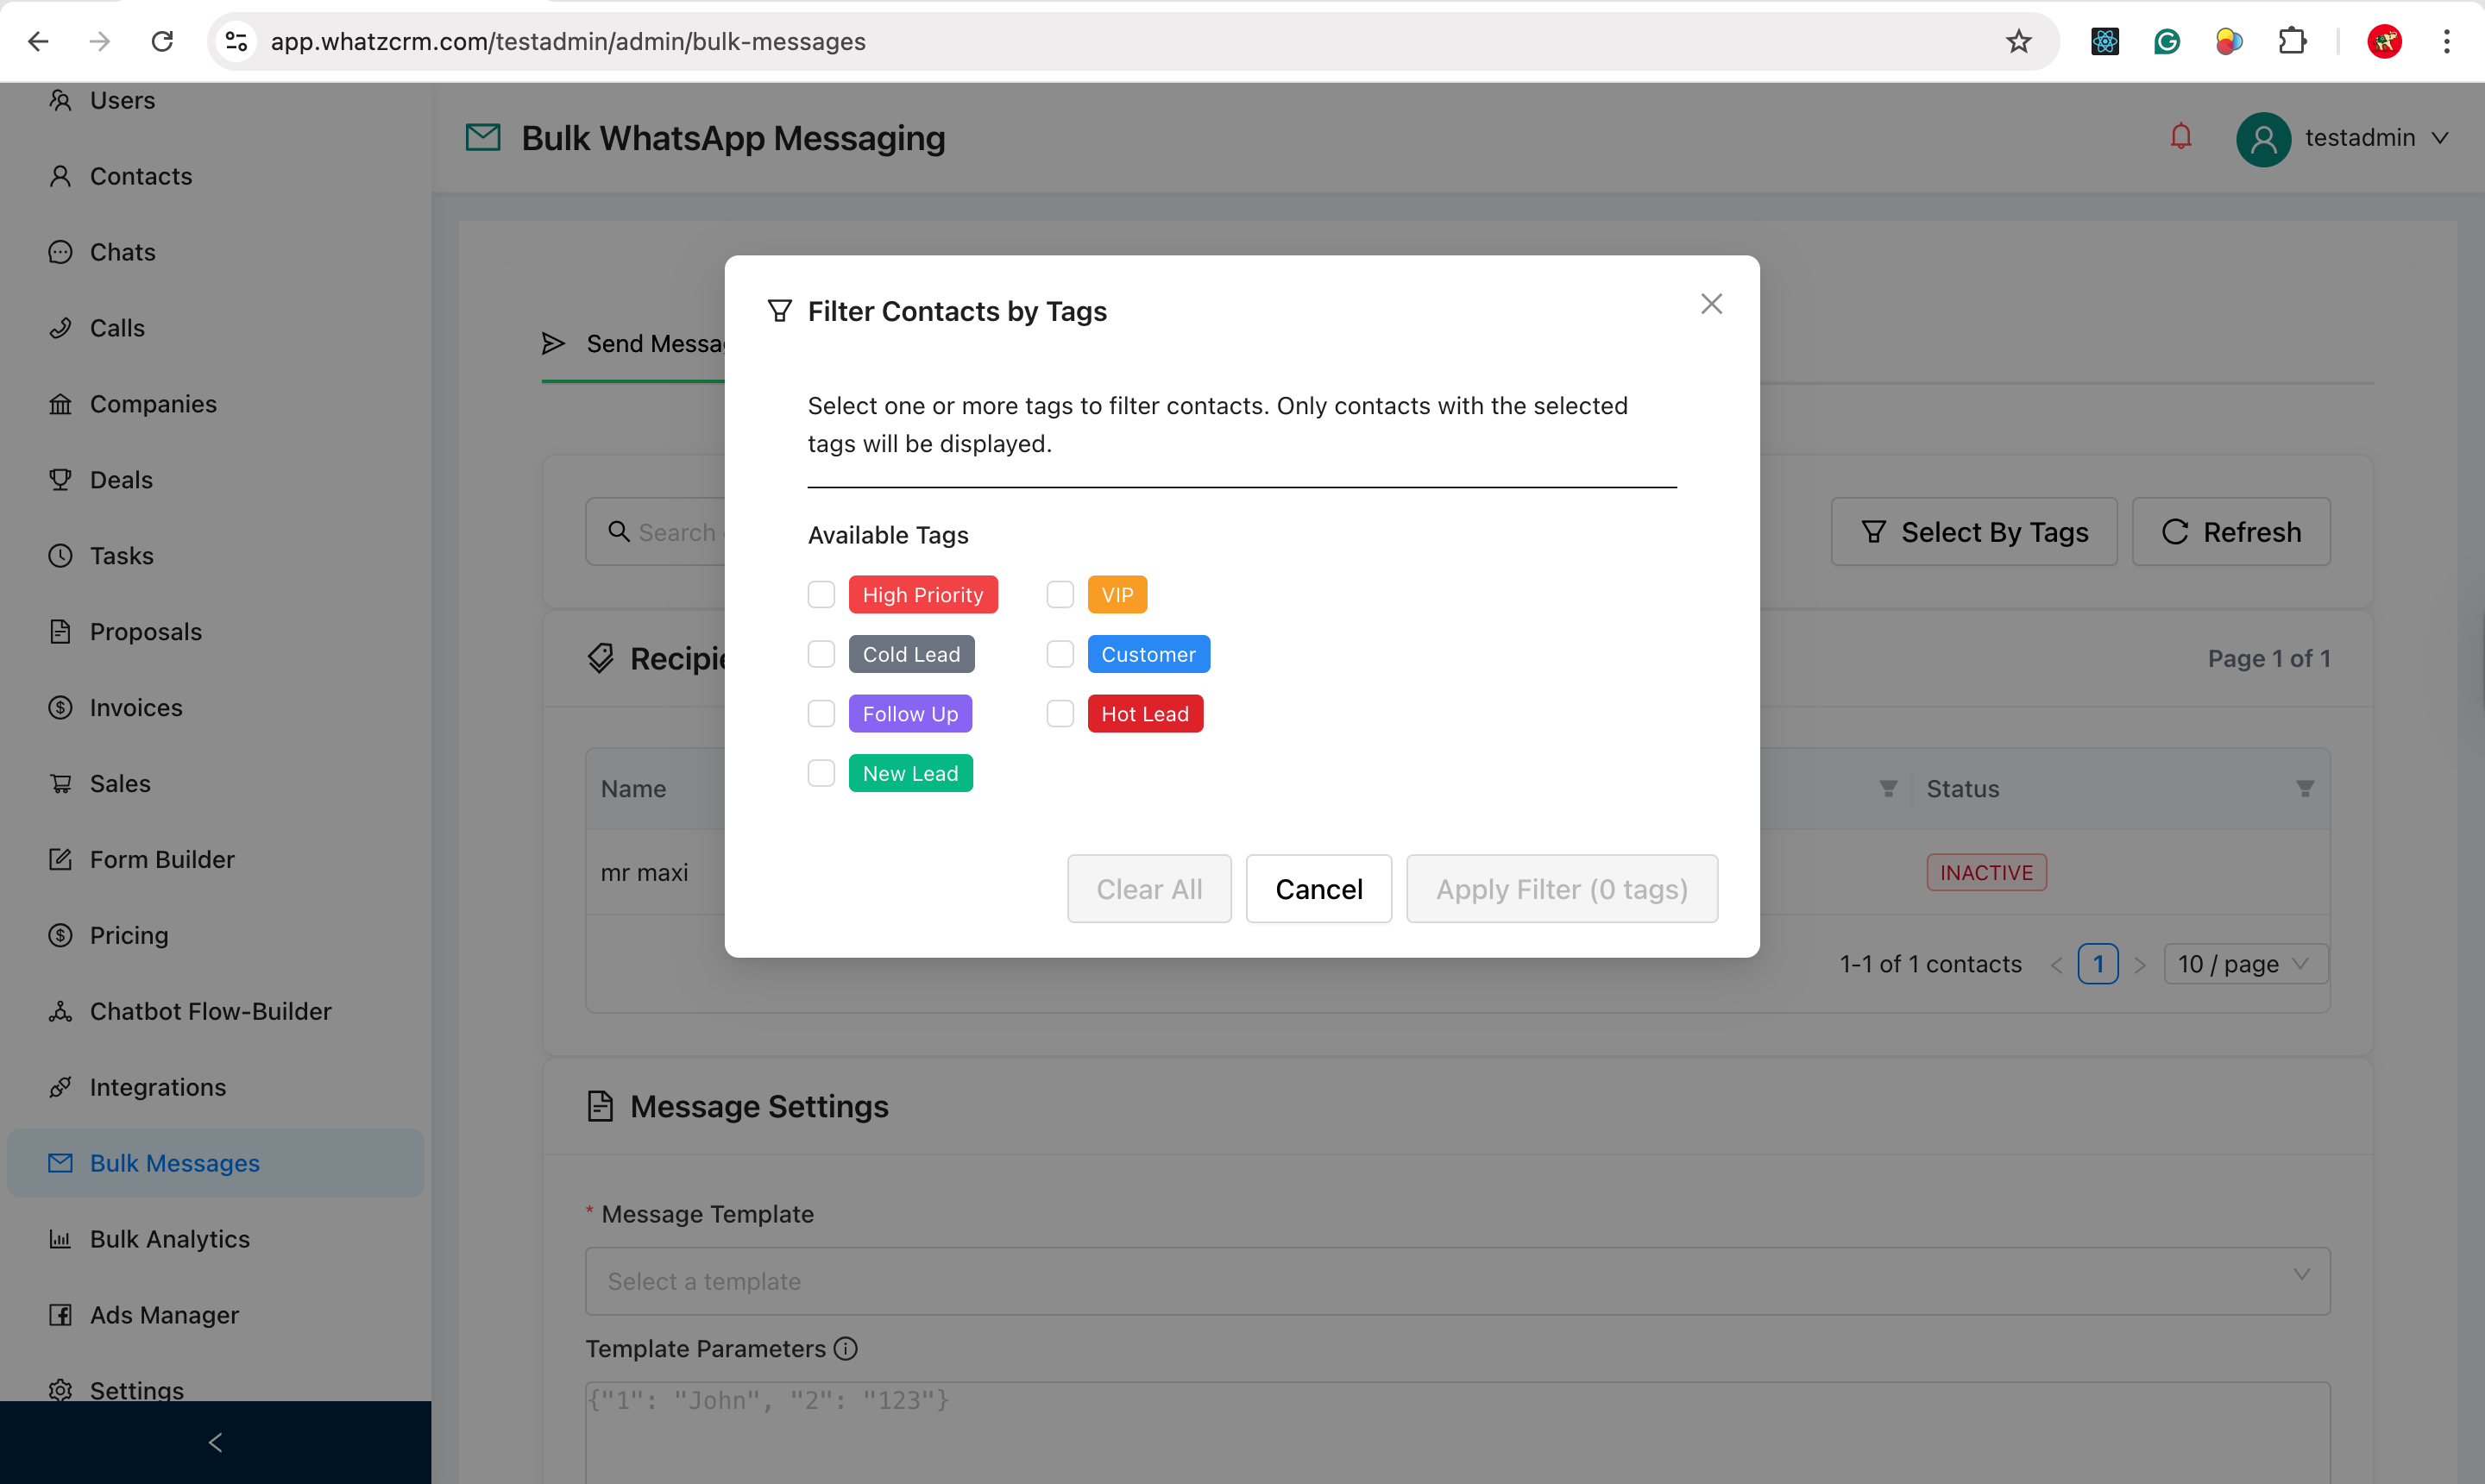
Steps:
- Click Select By Tags.
- A popup opens with available tags such as:
- High Priority
- VIP
- Customer
- Cold Lead
- Hot Lead
- Do Not Contact
- Select one or more tags.
- Click Apply Filter.
✅ Only contacts with the selected tags will appear in the recipients list.
📌 This ensures accurate and targeted bulk messaging.
2. Create a WhatsApp Message Template
Page: Template Management → Create New Template
WhatsApp requires pre-approved templates for bulk messaging. You can create and manage them inside WhatzCRM.
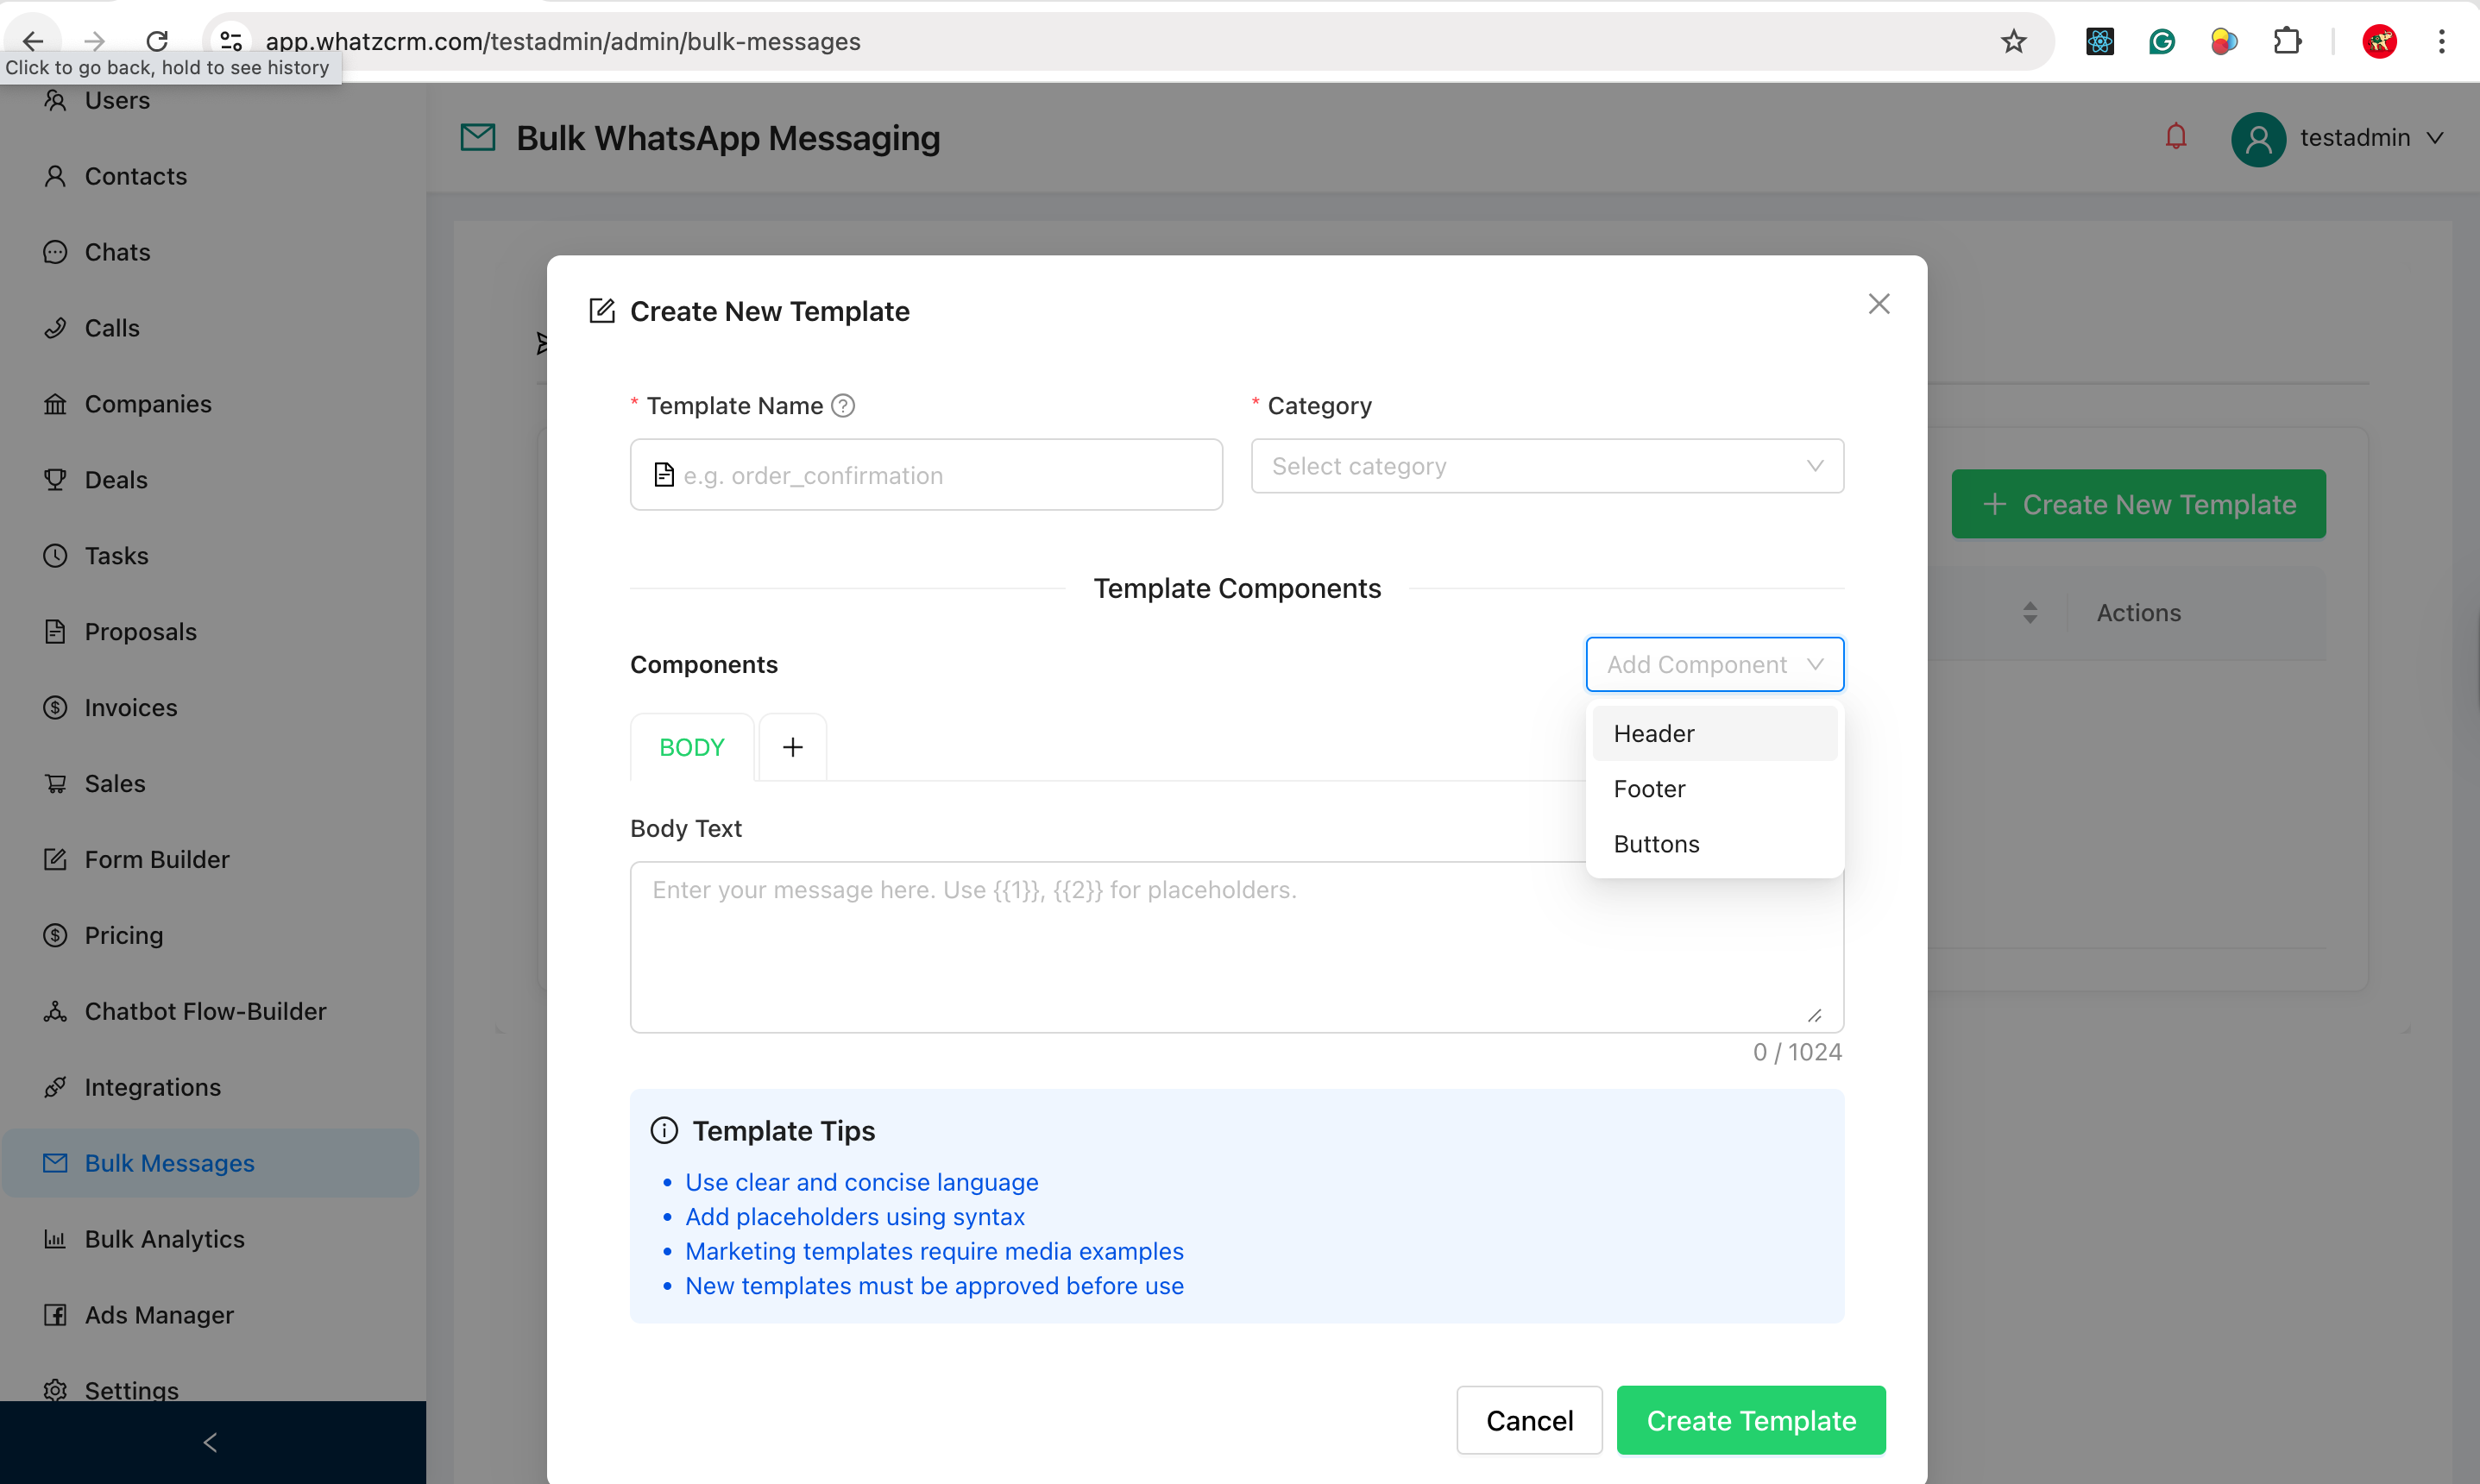
Steps:
- Click Create New Template.
- Enter:
- Template Name (e.g.,
order_confirmation,offer_alert) - Category (Utility, Marketing, Authentication, etc.)
- Template Name (e.g.,
🧩 Template Components
You can build templates using components: * ✅ Body (Required): Main message content * ➕ Optional Components: * Header: Title or media * Footer: Small note or disclaimer * Buttons: Call-to-action buttons (URL / Quick reply)
📌 Guideline: Use placeholders (e.g.,
{{1}}) to personalize messages dynamically. Templates must be approved by WhatsApp before sending.
3. Select Message Template & Send
Page Section: Message Settings
Once your template is approved:
Steps:
- Select a Message Template from the dropdown.
- Fill Template Parameters (if any) in JSON format.
- (Optional) Click Preview Message to verify the format.
Final Step: Send Messages
- Click Send to X Contacts.
- Messages will be sent to all eligible contacts via WhatsApp.
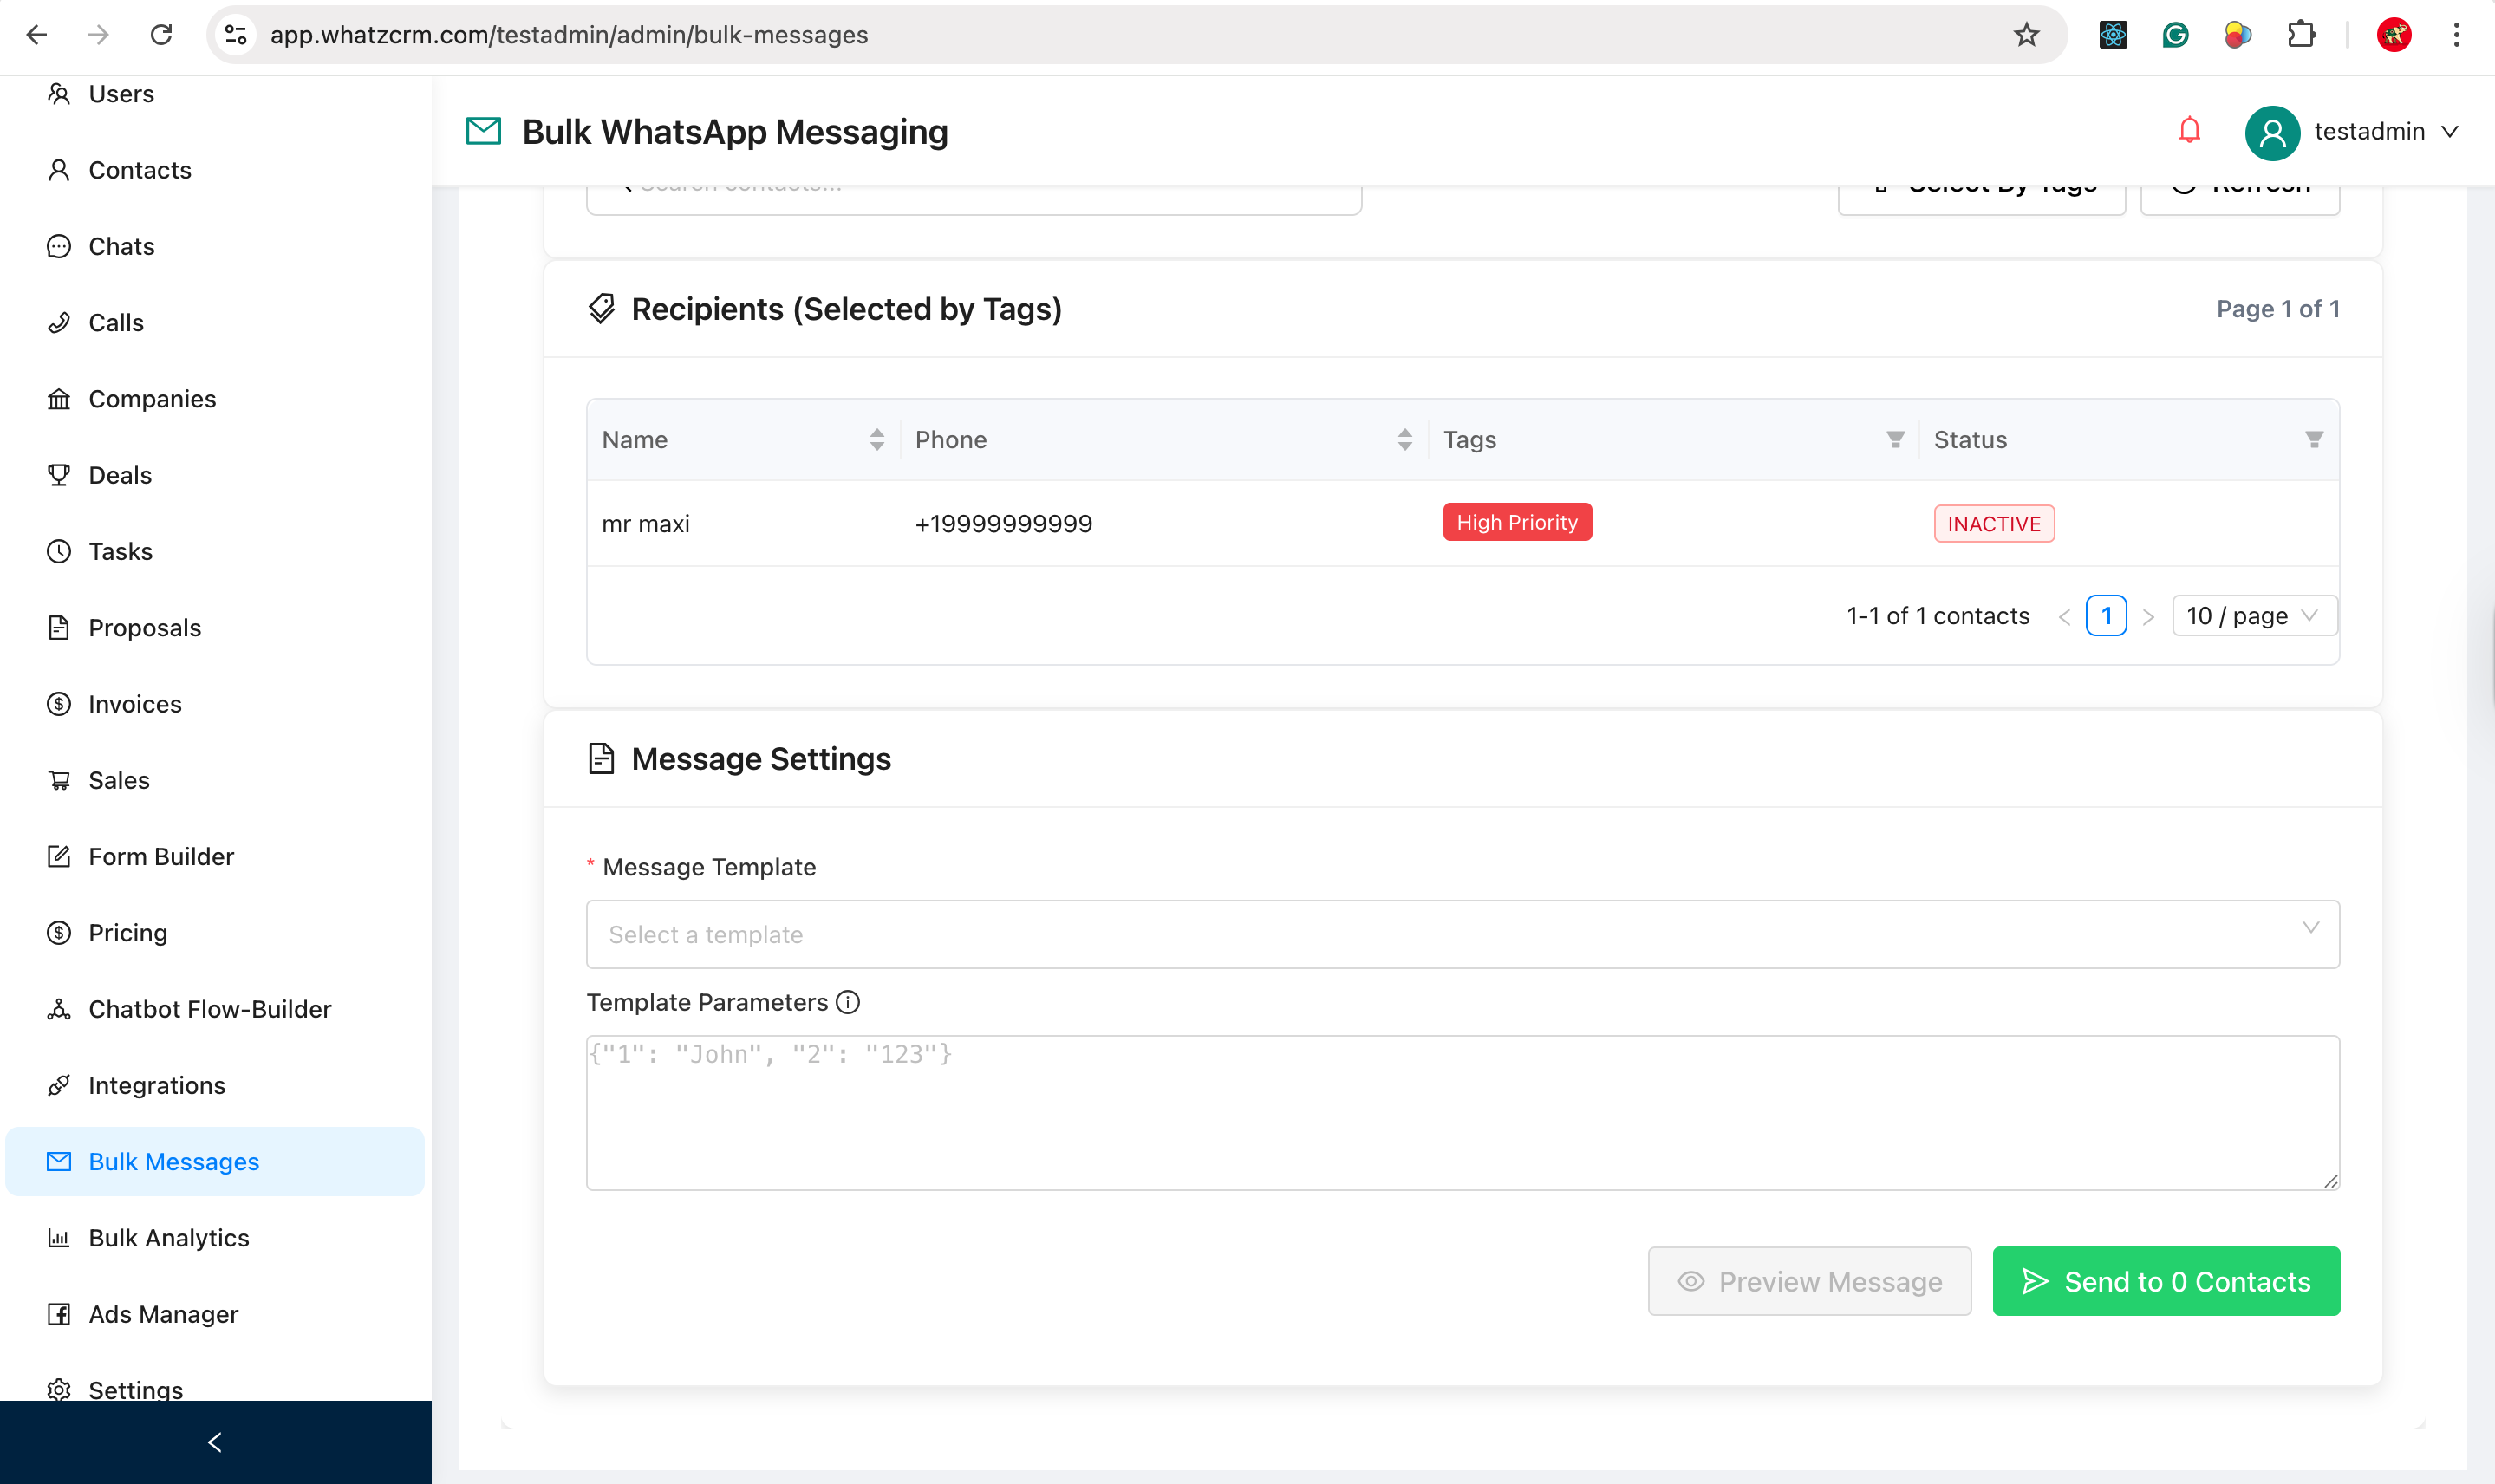
🚀 Your bulk WhatsApp campaign is now live.
🔟 Bulk Message Analytics & Campaign Reports
Page: Dashboard → Bulk Analytics
The Bulk Message Analytics section helps you track, monitor, and analyze the performance of all your WhatsApp bulk campaigns. It provides both campaign-level summaries and detailed message-level reports.
1. Campaigns – View All Bulk Campaigns
Page: Bulk Message Campaigns
This page displays a list of all bulk WhatsApp campaigns created in your organization.
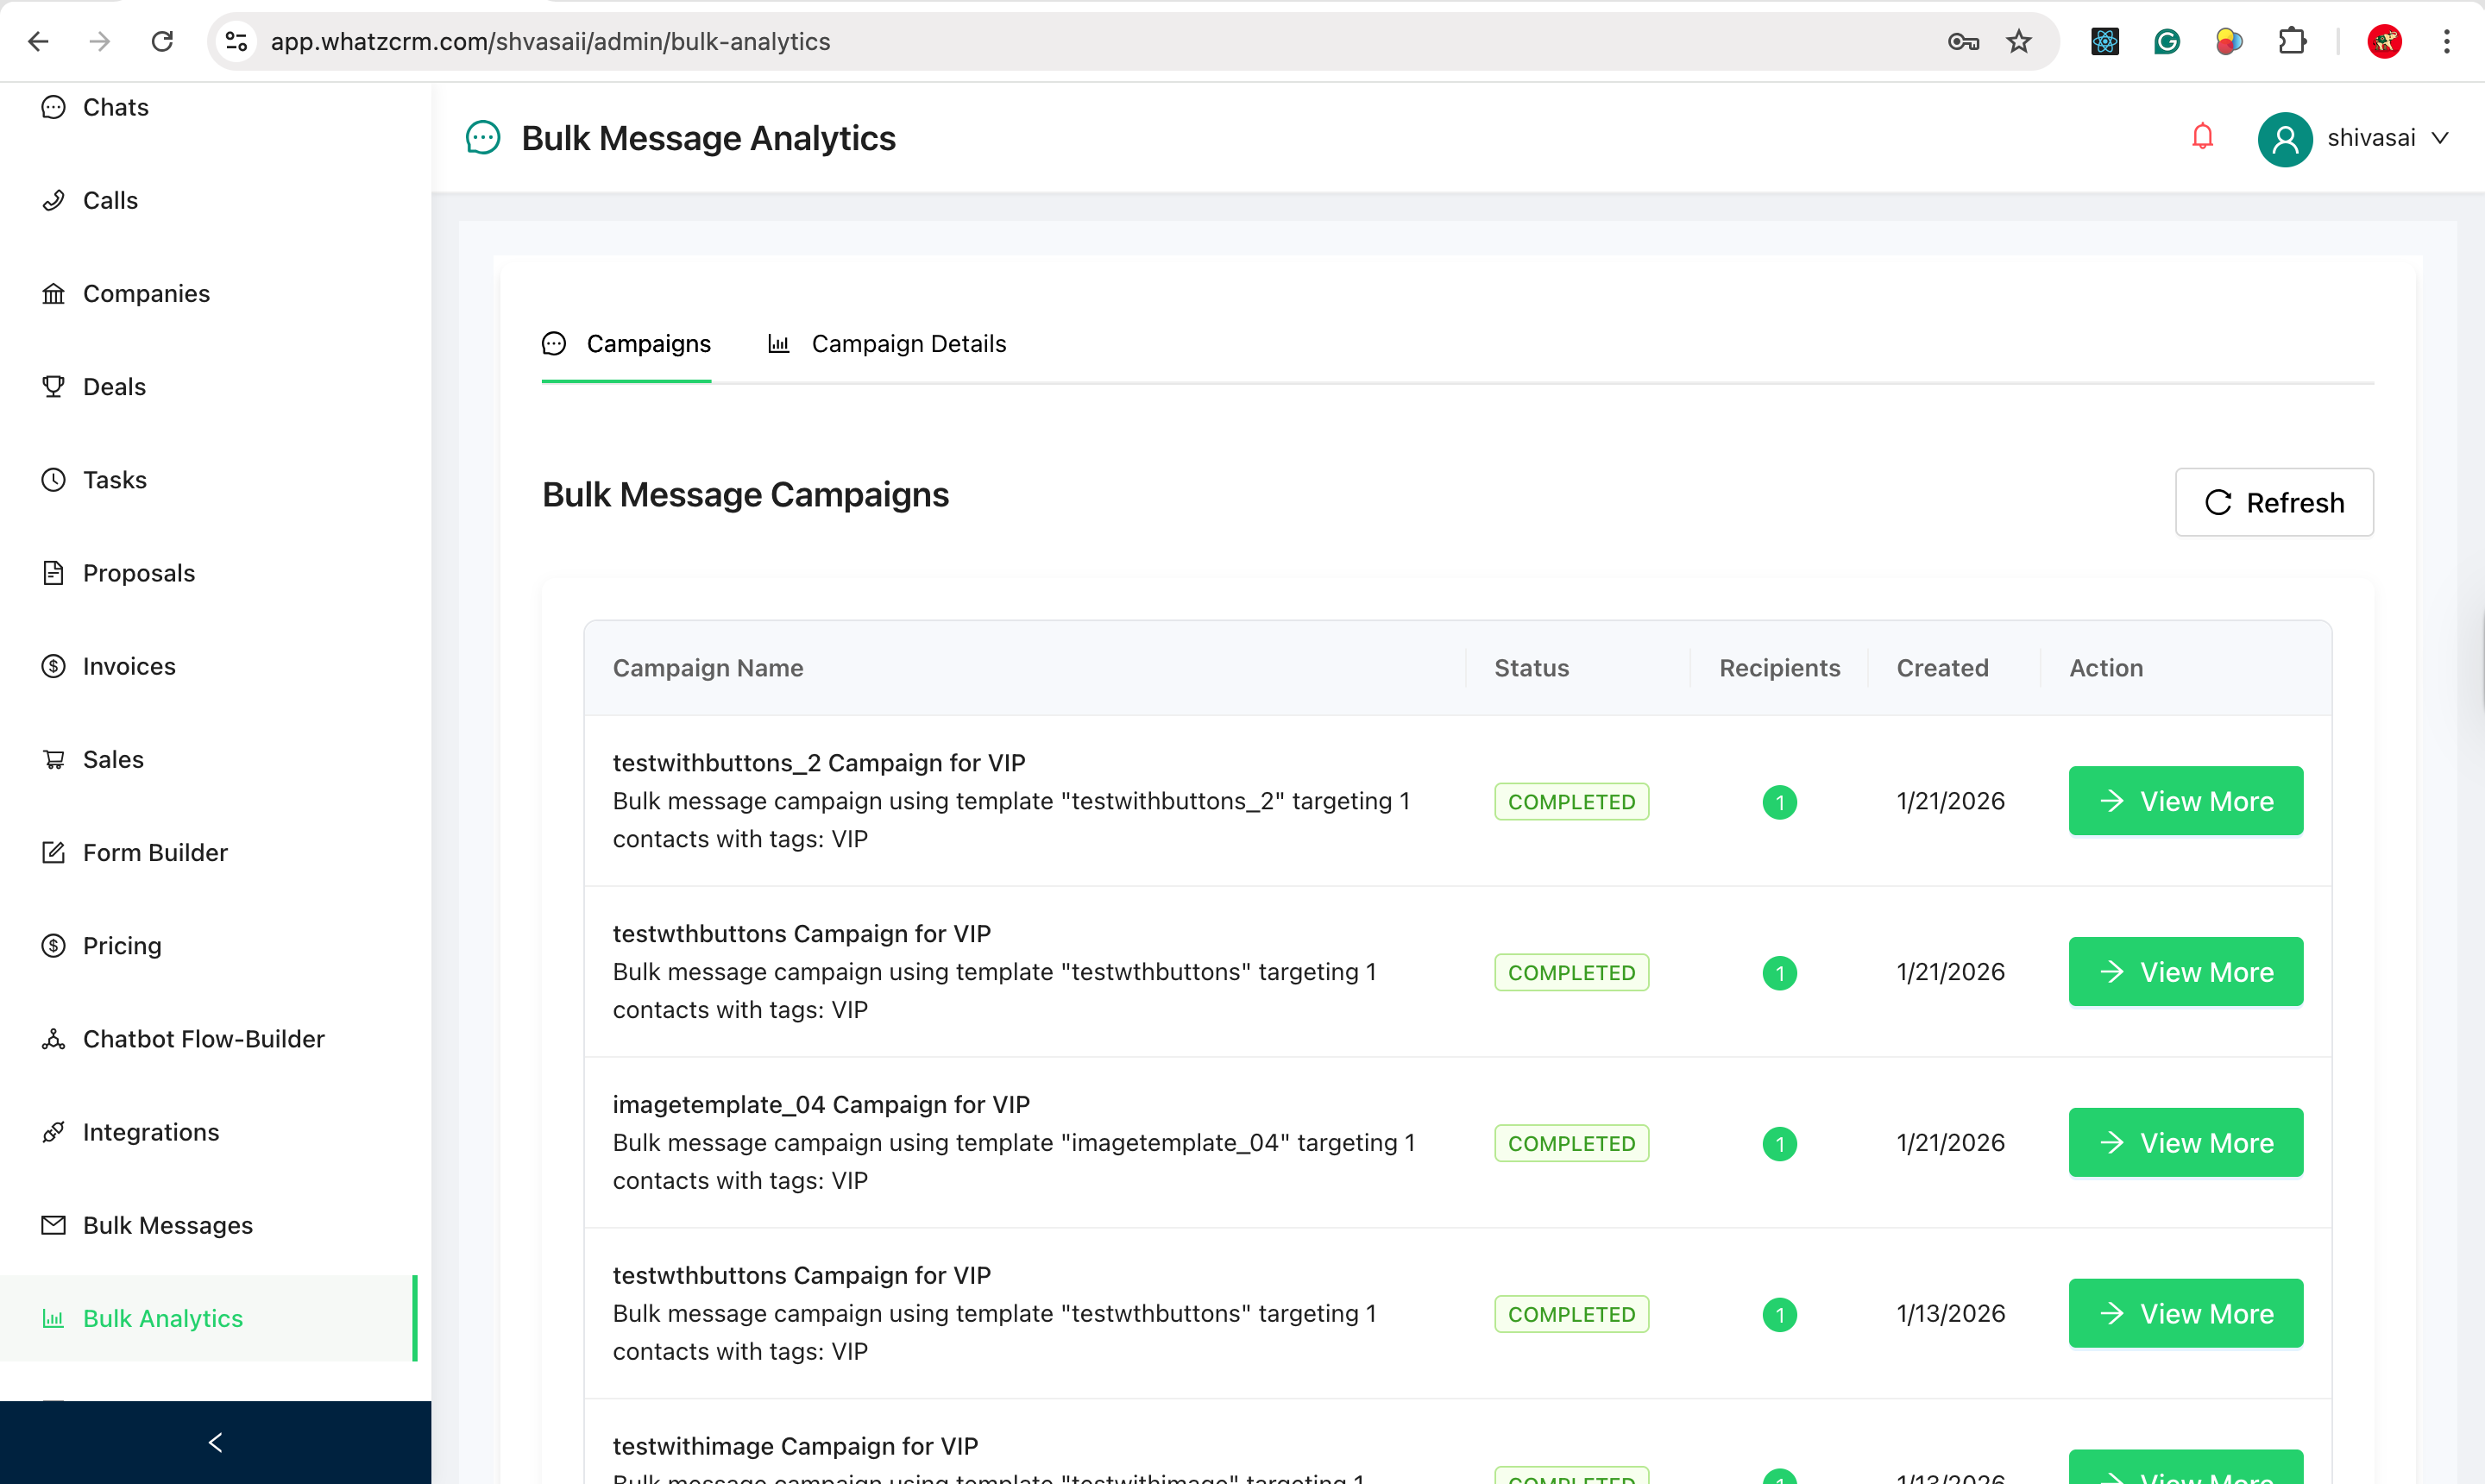
Information shown:
- Campaign Name
- Status (Completed / Pending / Failed)
- Recipients Count
- Created Date
- Action – View More
Status meanings: * COMPLETED – Campaign was processed successfully * PENDING – Messages are still being processed * FAILED – Campaign failed due to configuration or delivery issues
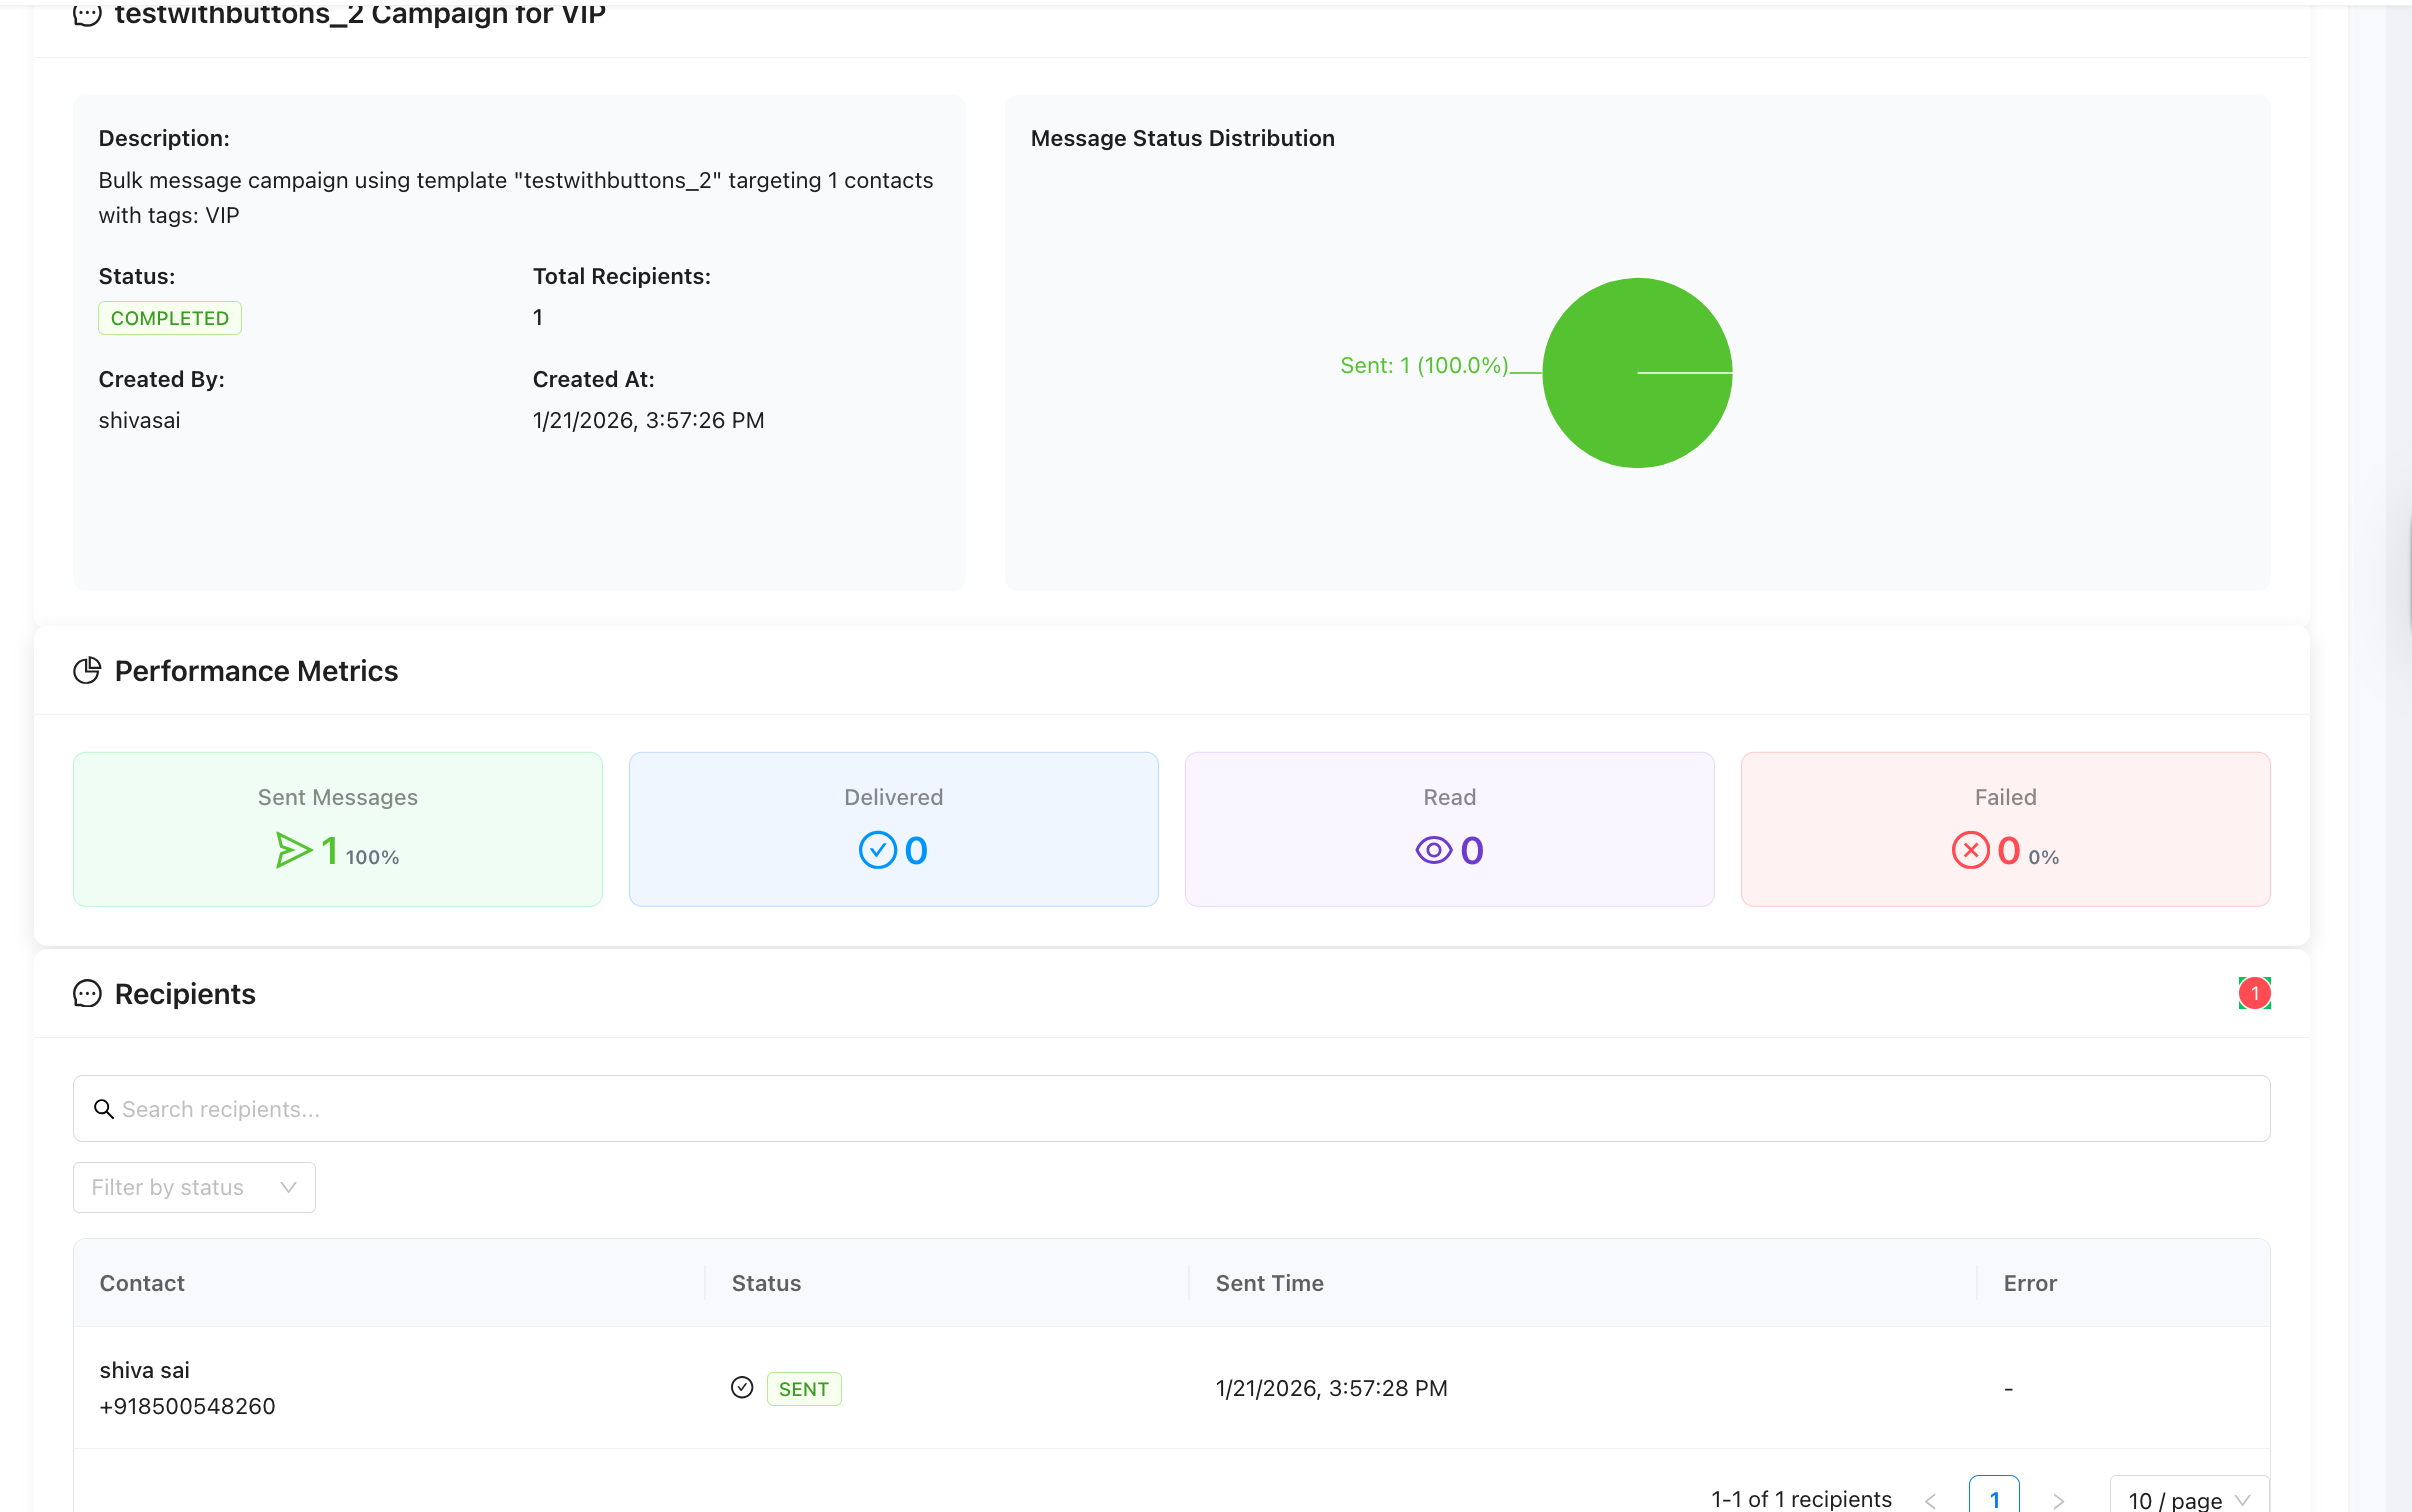
2. View Campaign Details
Page: Campaign Details
This page shows complete analytics for a selected campaign.
How to open:
- Go to Bulk Analytics → Campaigns.
- Click View More on any campaign.
3. Campaign Summary & Performance
Page Section: Summary & Metrics
This section gives you an instant overview of your campaign's health.
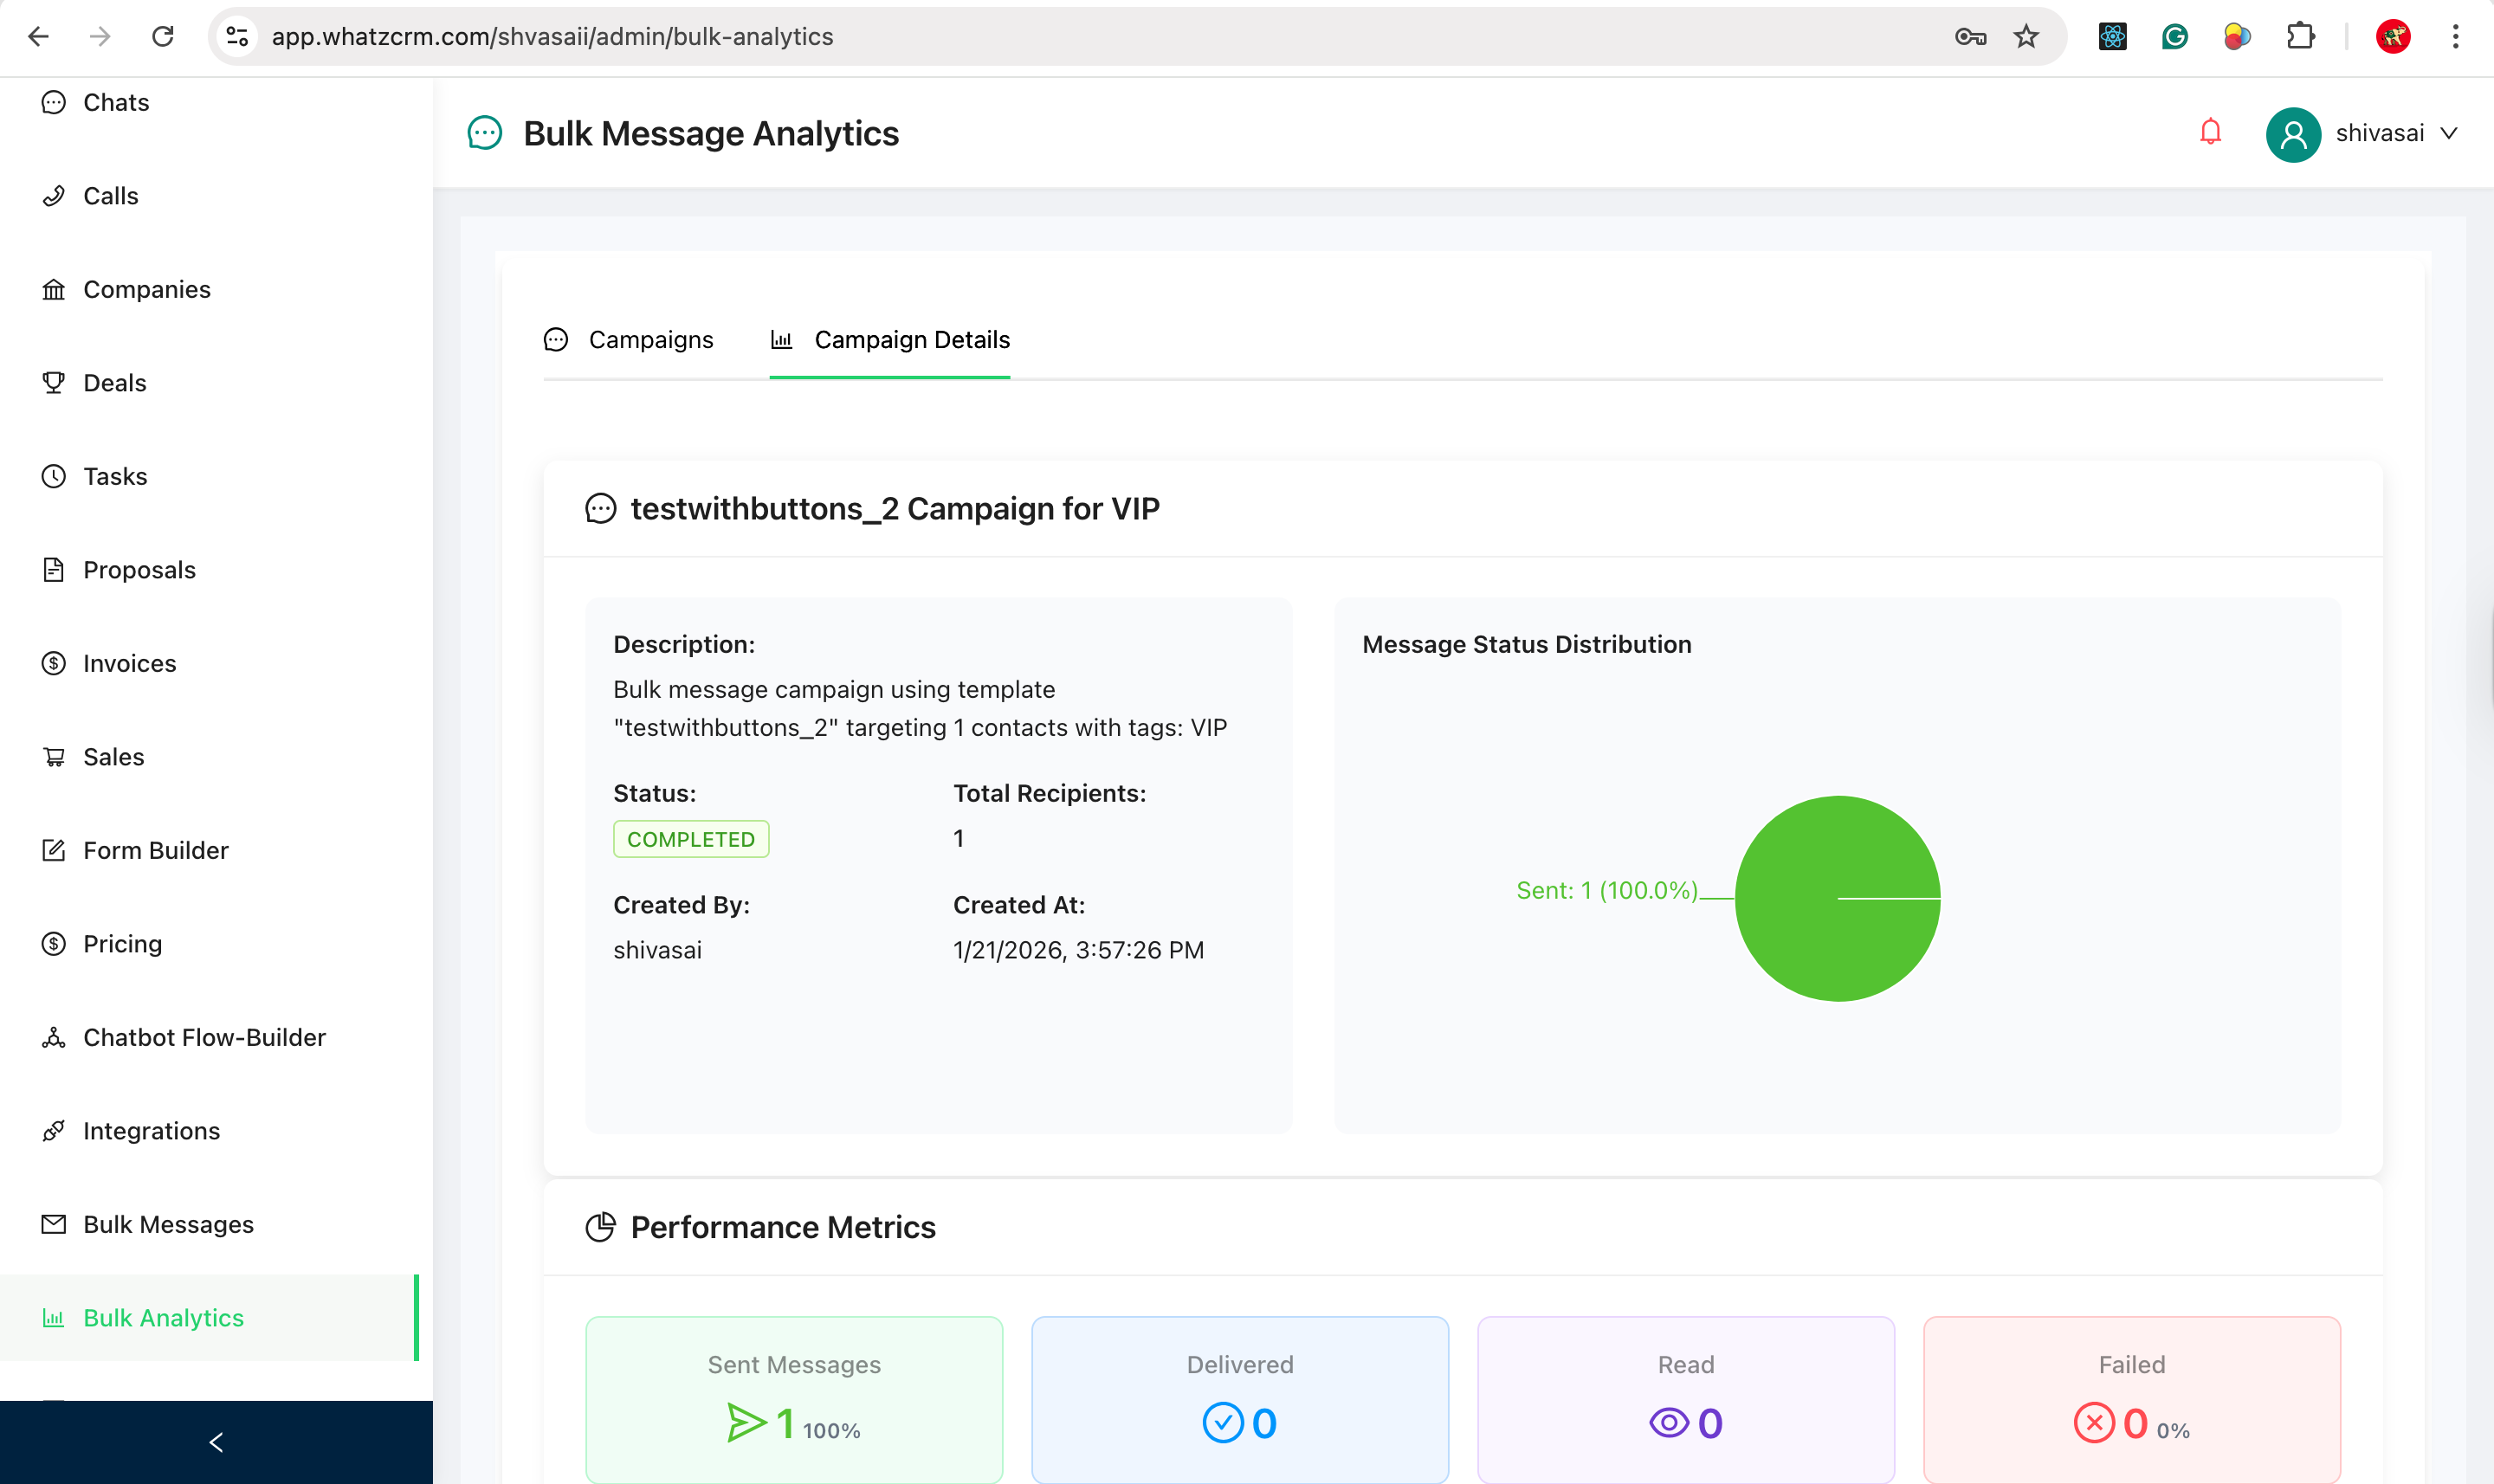
📊 Message Status Distribution (Chart)
A pie chart displaying real-time status percentages: * Sent: Successfully pushed to WhatsApp. * Delivered: Reached the user's phone. * Read: Opened by the user. * Failed: Could not be delivered.
📈 Performance Metrics
- Sent Messages: Total count sent.
- Delivered: Total confirmed deliveries.
- Read: Total read receipts.
- Failed: Total errors.
4. Recipients-Level Report
Page Section: Recipients
This section shows individual message status per contact, which is useful for debugging and follow-ups.
Information displayed:
- Contact Name & Phone
- Message Status (Sent / Delivered / Read / Failed)
- Sent Time
- Error Message (if any)
🎯 Why Campaign Reports Are Important: * Measure campaign success. * Identify delivery issues. * Track engagement. * Maintain WhatsApp compliance.
1️⃣1️⃣ Chats & Messaging in WhatzCRM
Page: Dashboard → Chats
WhatzCRM provides a role-based chat system where Admins can monitor conversations and Agents can actively chat with customers.
👥 Roles & Permissions
- Admin: View & monitor all conversations (Read-only).
- Agent: Send & receive messages with customers.
📌 Note: Admins cannot send messages. Only agents can reply to customers.
1. Admin View – Chat Monitoring
Page: Chats (Admin Panel)
Admins use this section to monitor customer interactions without interfering.
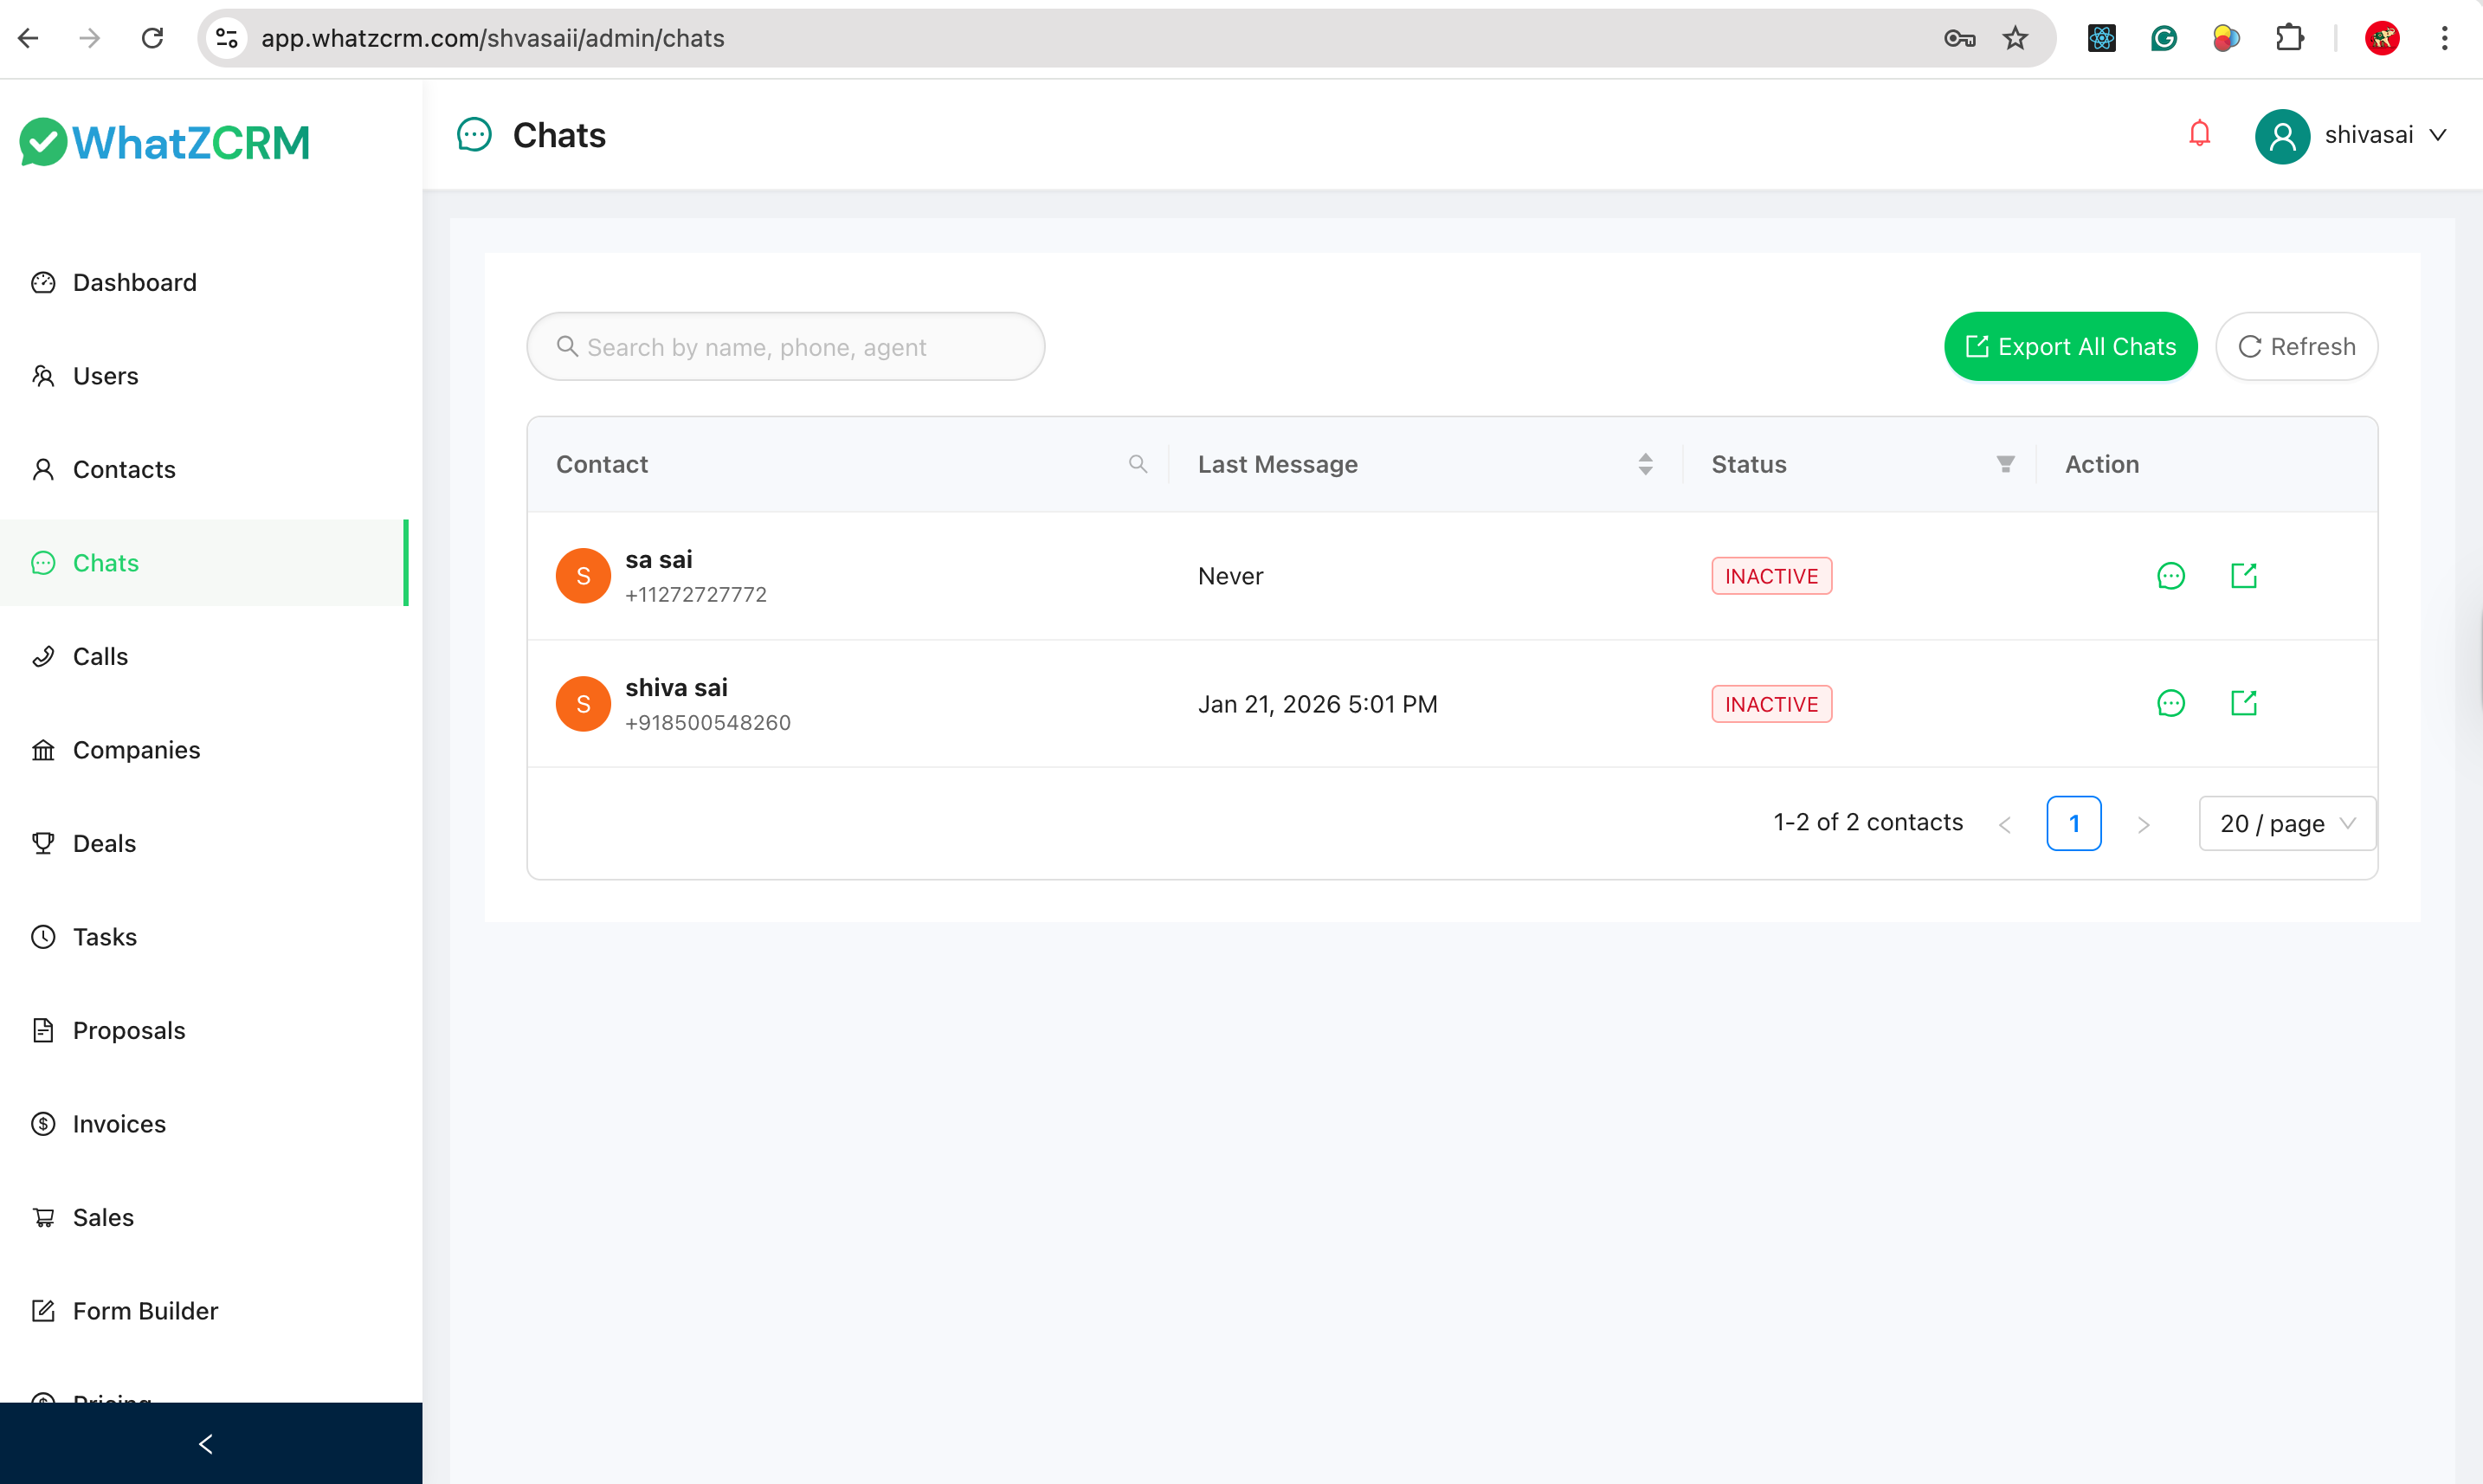
Admin capabilities:
- View all customer conversations.
- See last message and timestamps.
- Track conversation status (Active / Inactive).
- Search chats by: Contact name, Phone number, Assigned agent.
What Admins CANNOT do:
- ❌ Send messages
- ❌ Reply to customers
- ❌ Modify chat content
✅ This ensures compliance and controlled communication.
2. Chat Conversation View (Admin – Read Only)
Inside a chat
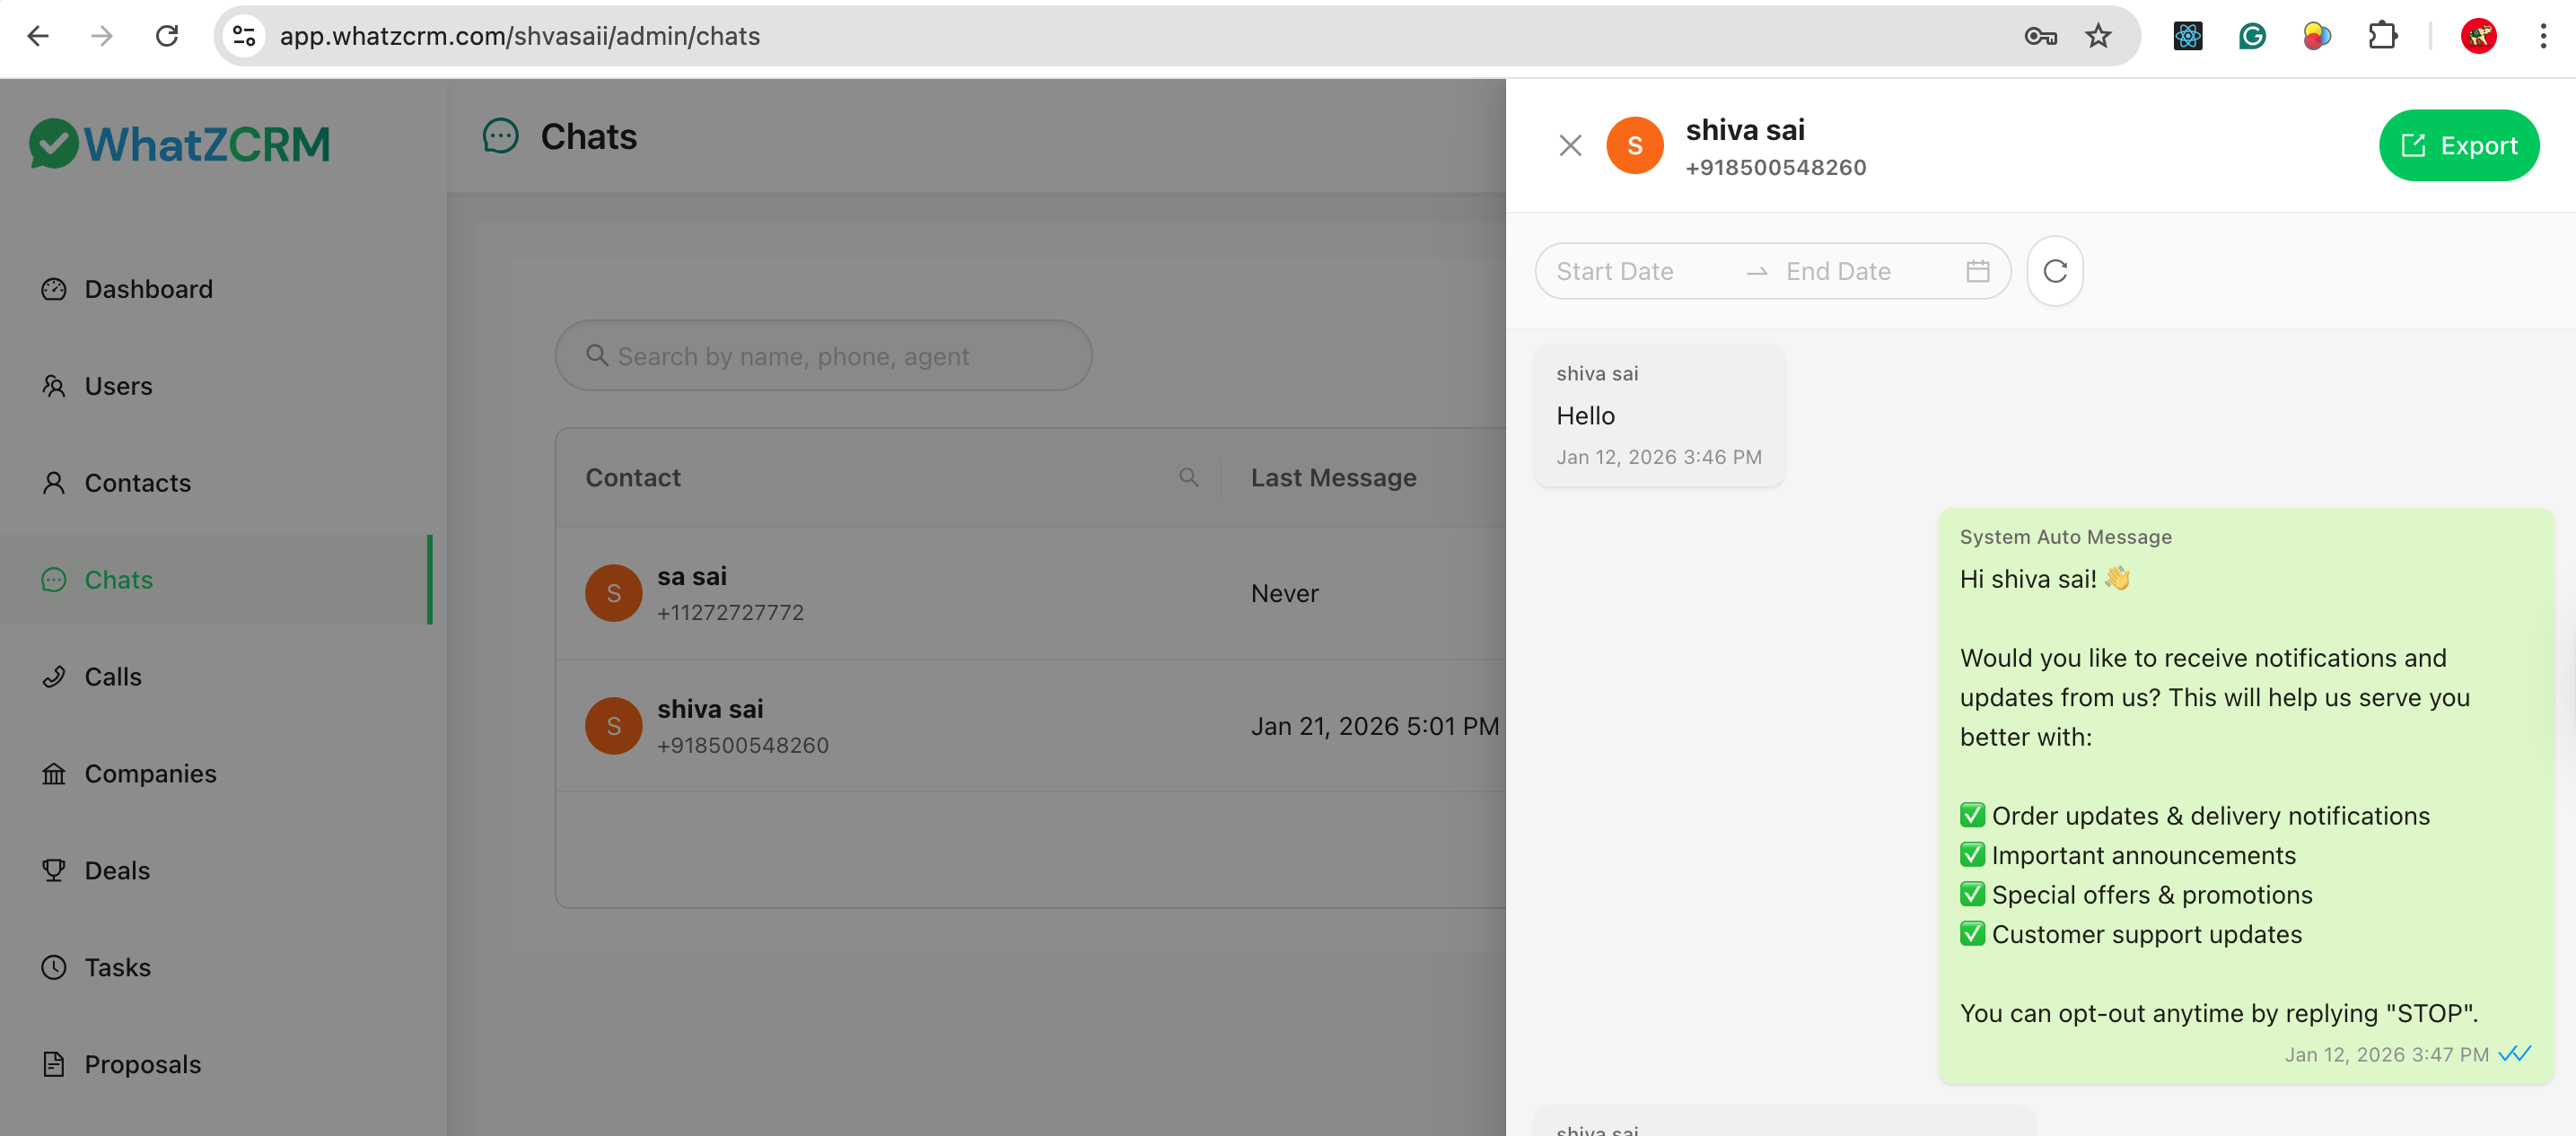
Features:
- Full message history.
- System messages.
- Customer replies.
- Date & time stamps.
- Export: Download individual chat history.
📊 Ideal for: Quality monitoring and performance reviews.
3. Agent View – Live Chat with Customers
Page: Chats (Agent Panel)
Agents use this interface to communicate directly with customers.
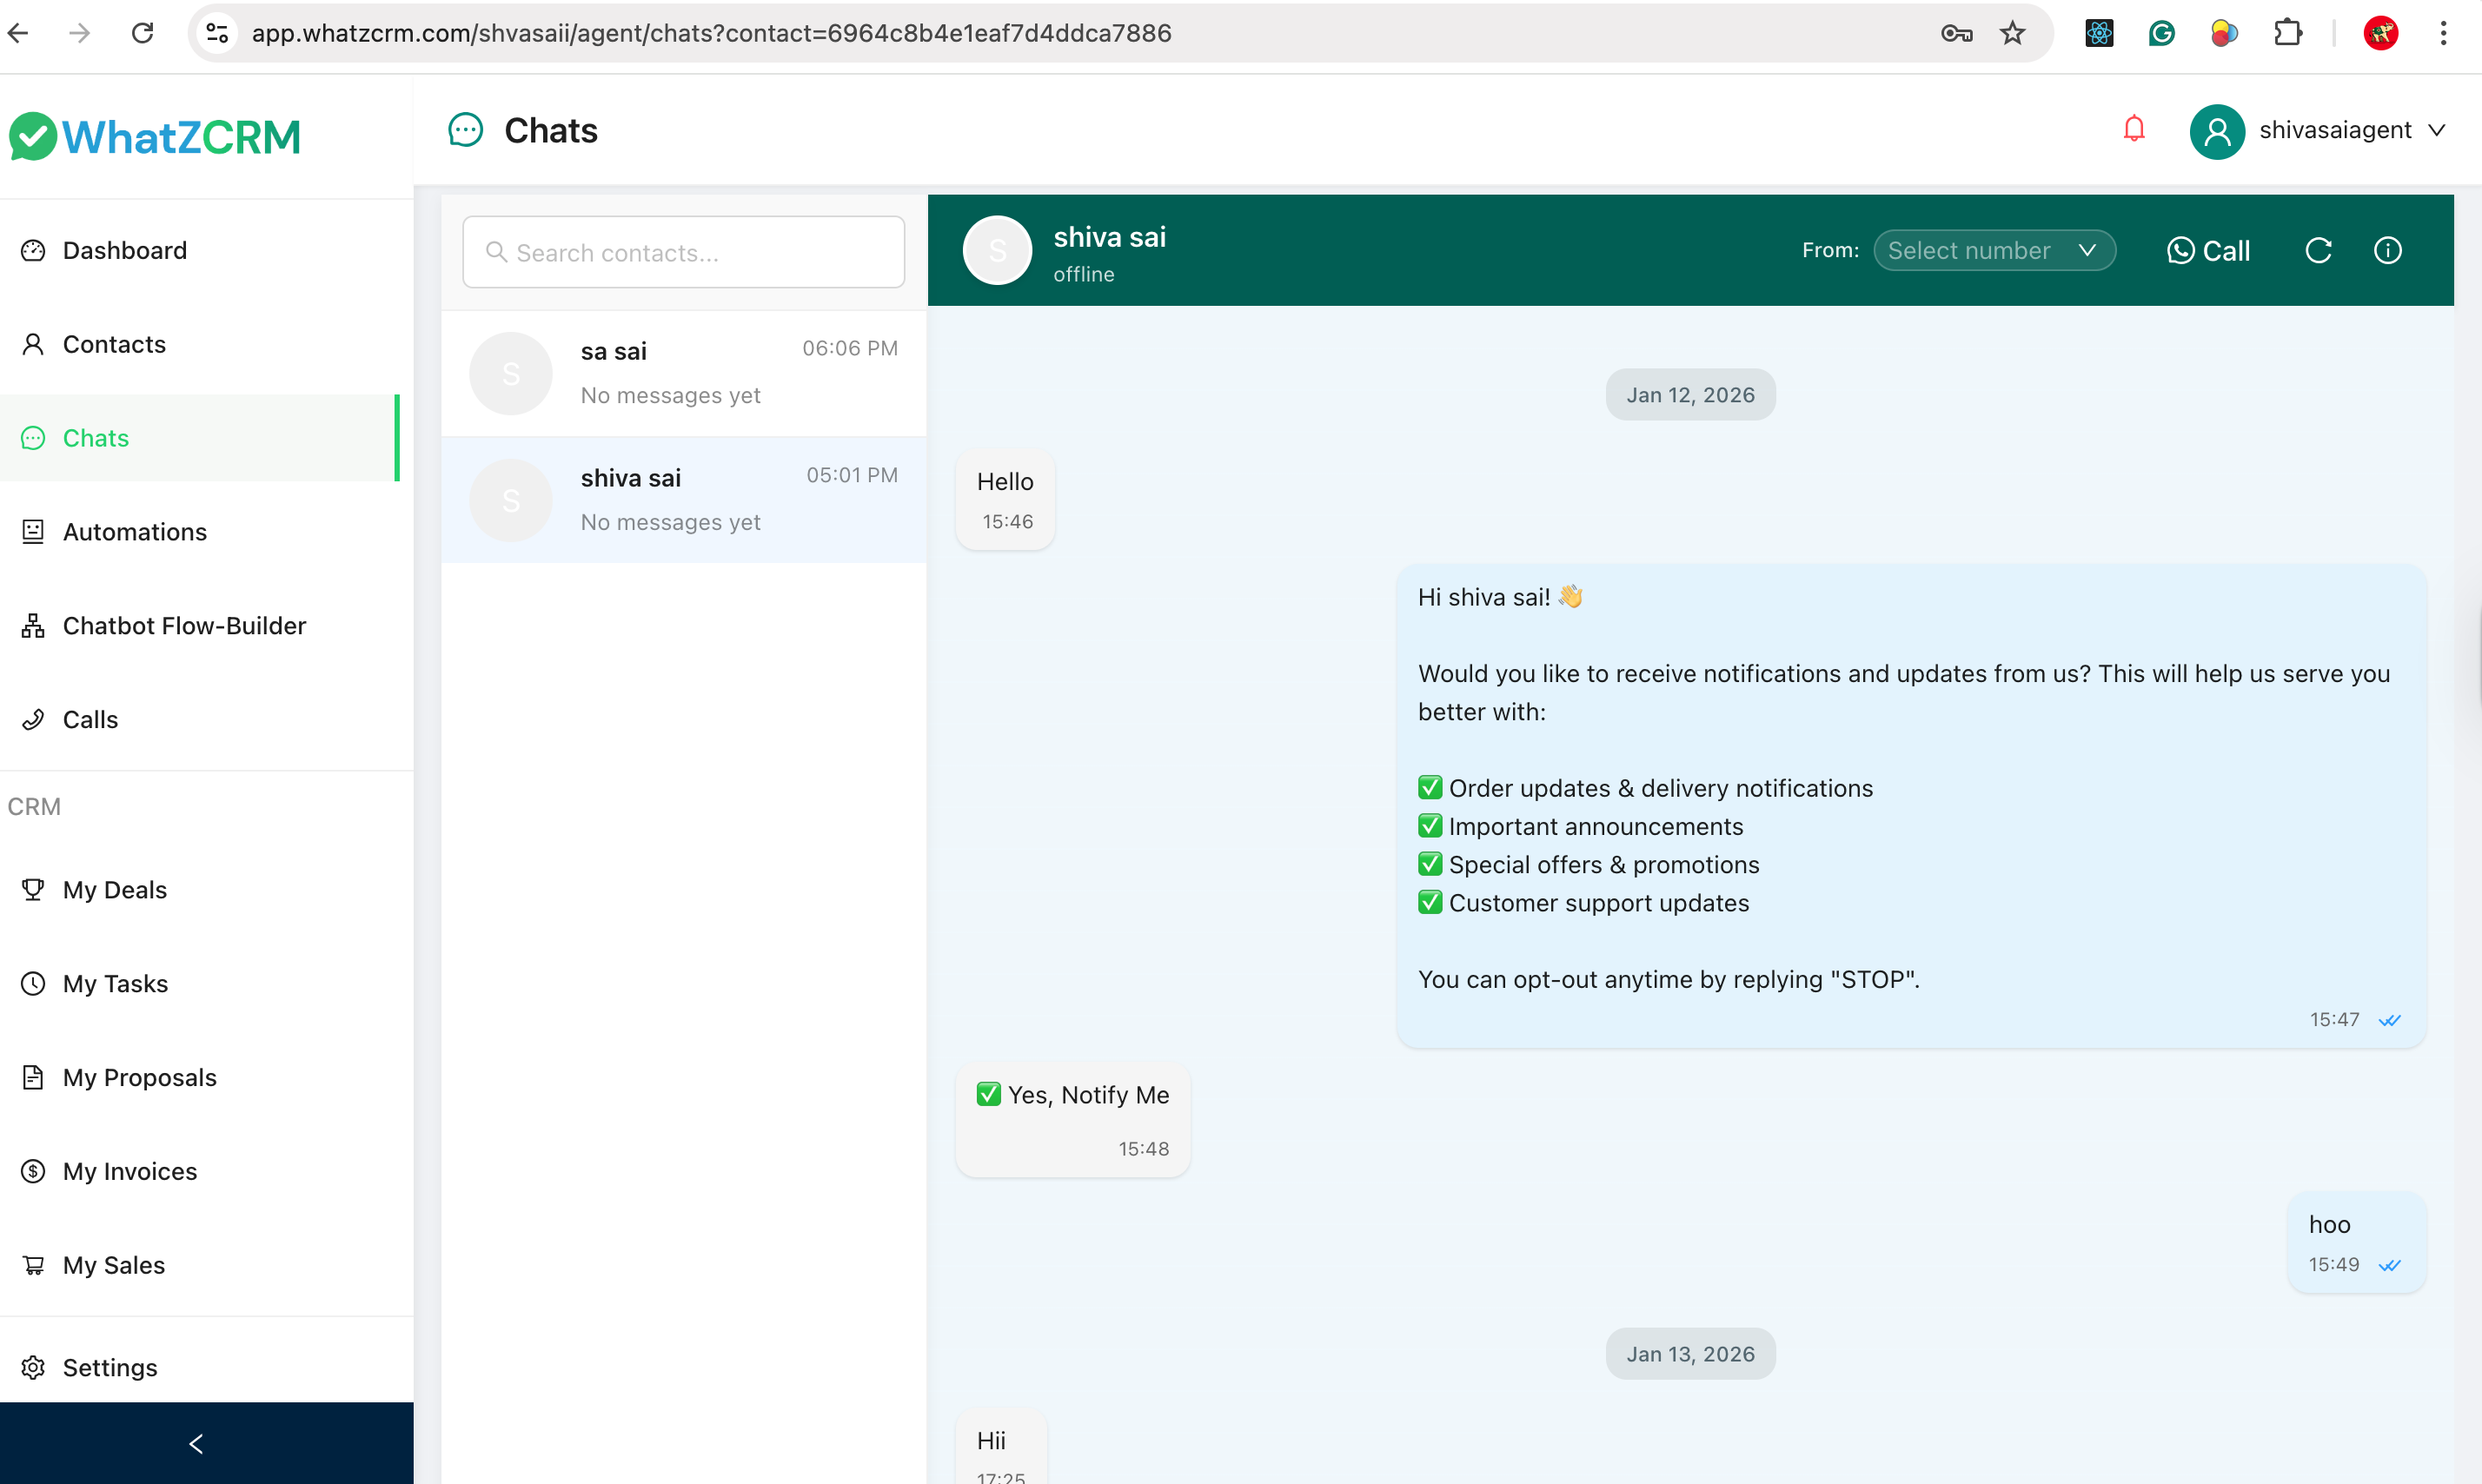
Agent capabilities:
- ✉️ Text Messaging: Real-time sending with emoji support.
- 🖼 Media Sharing: Images, Documents, Attachments.
- 📞 Call Support: Initiate WhatsApp calls (if enabled).
- 🤖 System Messages: Auto-replies and notifications.
Message Status & Timeline
Each message clearly shows: * Sent time * Delivery ticks * Date separators * System vs user messages
✅ Summary: This role-based system ensures secure communication, clear accountability, and easy monitoring for business owners.